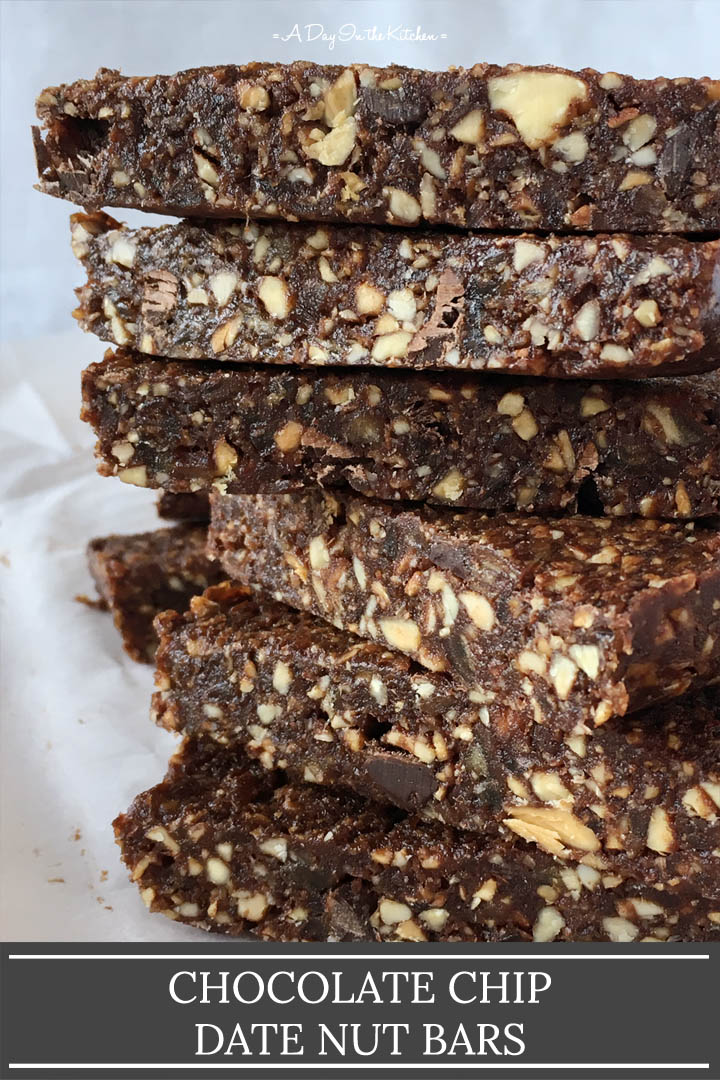
Make your own chocolate chip date nut bars with only 5 ingredients and save money in the process! You won't need to spend money buying expensive energy or snack bars once you see how easy it is!
People are really into their bars.
And I'm not talking about places where you go have a beer or a few drinks with friends.
I'm talking energy bars. Date bars. Granola bars. Nut bars. Snack bars.
People are always on the go, often wanting to have something like an energy bar handy for a quick bite or something to tide them over until their next meal.
And their popularity is evident when you walk down the snack aisle in any grocery store...there is a crazy selection of bars available!
However, the "healthier" options can be expensive, and the more affordable ones are often loaded with preservatives, artificial flavors, and sugars.
So what do you do?
You make your own bars, is what you do!
It's Easier Than You Think
Bars like these chocolate chip date nut bars are comparable to Lara Bars in terms of ingredients and texture. If you're interested in other bar options, check out my Simple Nutty Granola Bars or Chocolate Chip Cashew Date Bars.
For this recipe, all you need are dried dates, nuts, cocoa, chocolate chips, and a splash of pure vanilla extract.
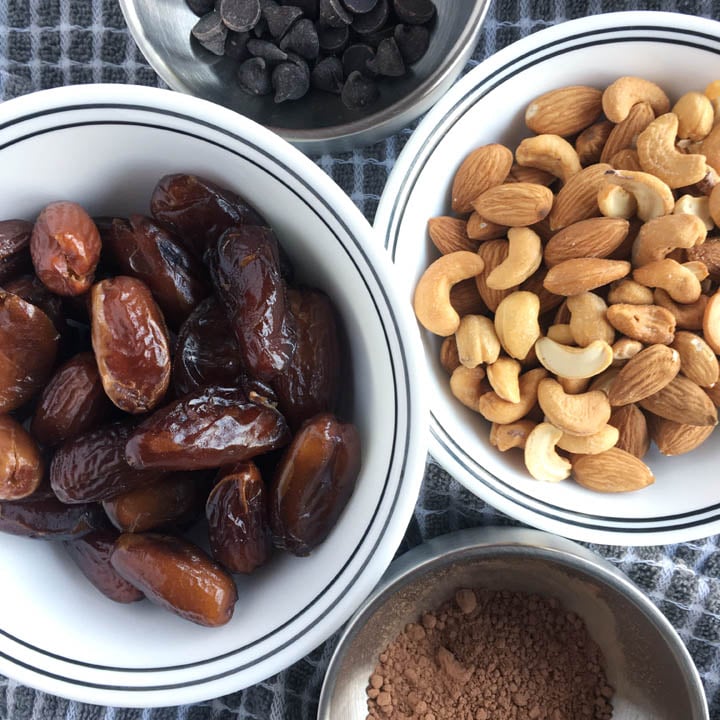
I like to use a combination of almonds and cashews as the almonds are harder than cashews and give it a bit of added texture. However, you can use all cashews, all almonds, or use a combination of nuts you prefer.
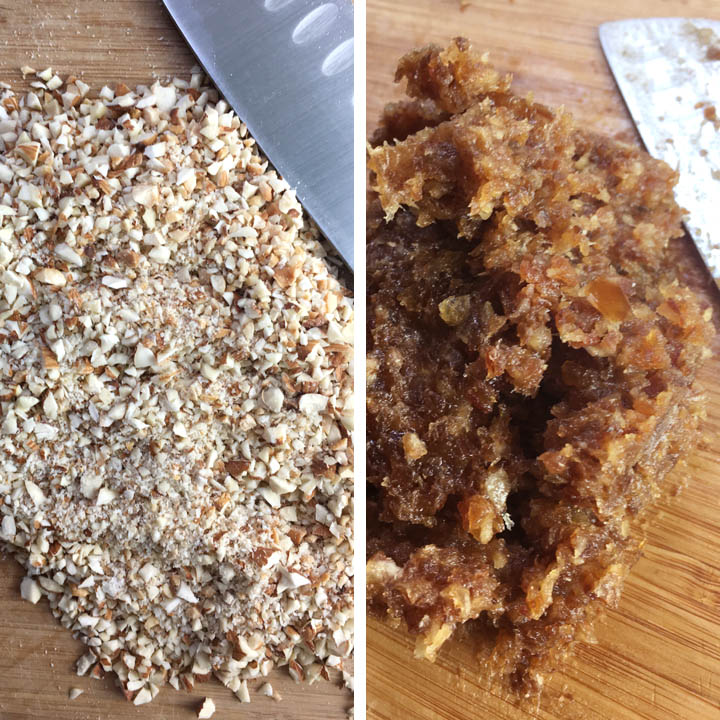
The nuts need to be chopped into small pieces and a food processor is definitely the fastest way to achieve that. After the nuts are done, empty those out, and, after the dates have had about a 10 minute soak in warm water, it's time for them to have a spin in the processor until they become a thick paste.
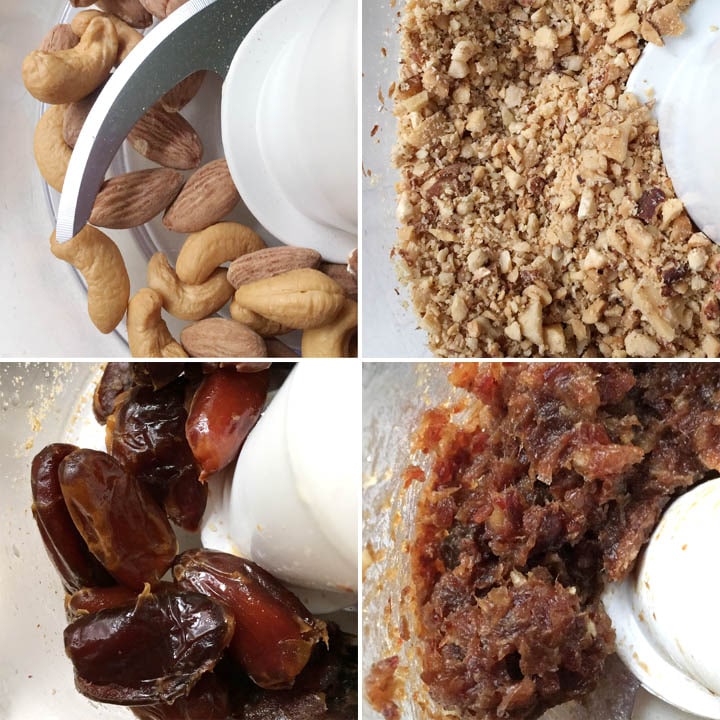
Keep in mind that, while a food processor is the fastest way to prepare the nuts and the dates, you can certainly achieve the same results from chopping by hand. I have done it several times and even though it requires a bit more work and elbow grease, it's completely doable.
Once you've got the chopped nuts and the date paste, it's time to mix it all together with the remaining ingredients until the "dough" all comes together. If the mixture is still a bit dry, simply add a teaspoon of water (from when the dates were soaking) and mix well.
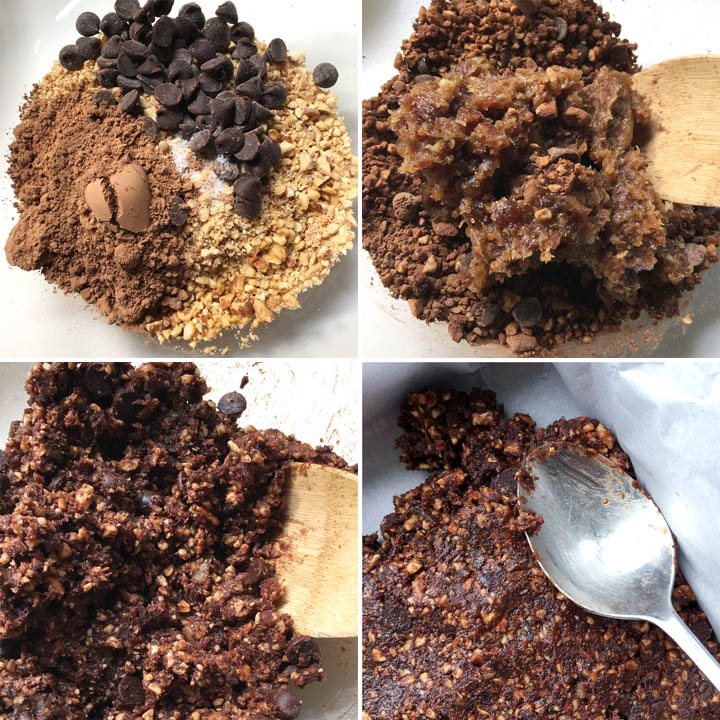
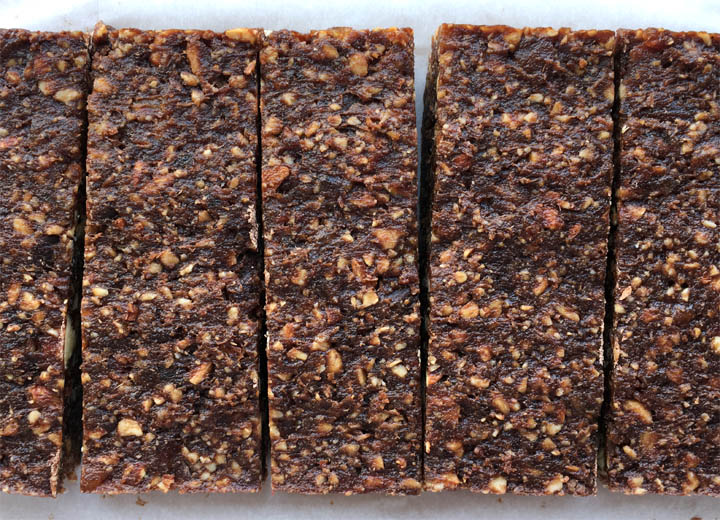
Then this nutty date mixture needs to be pressed into a parchment-lined pan...and I mean really PRESSED. I use the back of spoon to really push the mixture down and into the edges and corners of the pan. The better compacted you can make it, the better your bars will hold together.
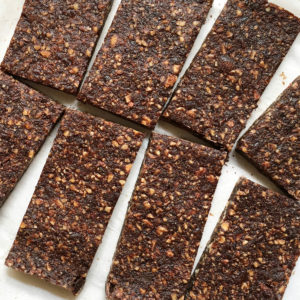
You can use an 8x8 square pan or a rectangular loaf pan. The square pan will give you thinner bars than the loaf pan, but you will still be able to get 8 full bars from each.
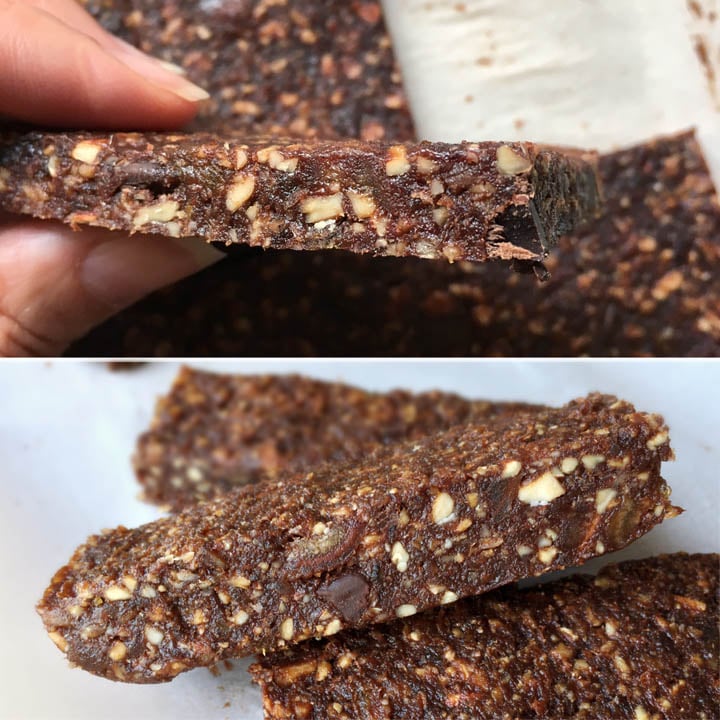
Once the bar mixture is happily packed into the pan, let it firm up in the refrigerator for at least an hour before cutting, and then store the bars back in the fridge. Wrap them up individually for easy grab-and-go snacks, or store them in single layers separated by parchment in a sealed container.
Customizing Your Bars
Aside from saving some money, another advantage to making your own bars is that you know exactly what you are putting into them and that you can customize them how ever you'd like!
For example, you could skip the chocolate chips and cocoa and make them purely from the dates and nuts and vanilla for a super basic bar.
As I mentioned earlier, you can use all of one variety of nut like cashews, almonds, pecans, walnuts, etc., or make a combination.
Try substituting pumpkin seeds for half the nuts, use shredded coconut, dried cranberries, etc.
Substitute the vanilla extract with a different flavor extract like almond, lemon, or peppermint.
Add a dash of cinnamon for an autumn twist. Try adding a teaspoon of cold coffee to the mix for a bit of caffeine.
You can do a lot with these bars if you really think about it!
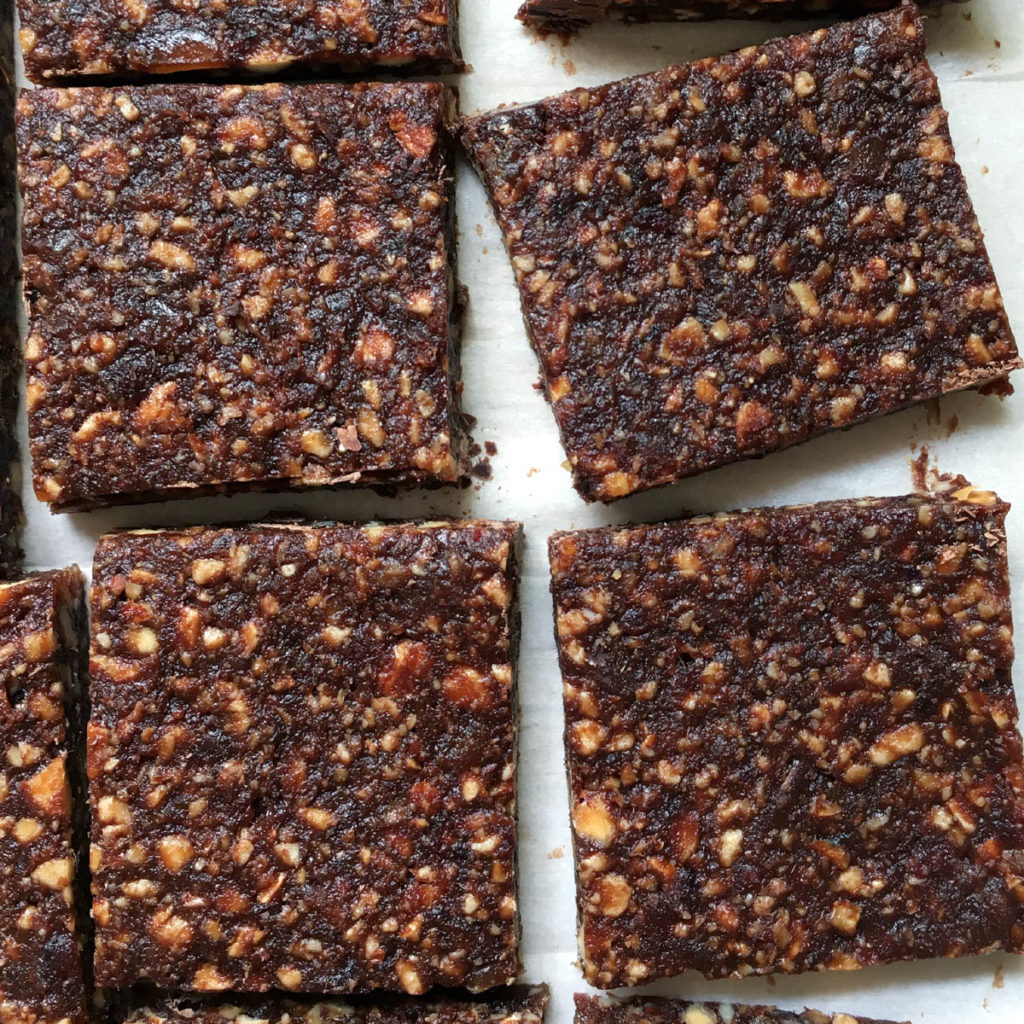
Sometimes a full bar is more than plenty for me, so I'll cut the date nut bars in half, giving me 16 squares...it's a smaller portion and there's more to go around! And hey, if you don't like squares or rectangles, you can also roll these up into balls and roll them in a dusting of cocoa!
These bars are not crumbly, and yet they are easy to break into chunks. They are dense and chewy and a small square can be all you need to tide you over until your next meal. They are what I make to take along on outings or hikes, on flights (for emergency food!), or to pack in school lunches, and they are also great for a quick breakfast bite.
Five ingredients at its most basic, easily customizable, and cheaper than store-bought brands. What are you waiting for? 😉
~ Lisa.
Chocolate Chip Date Nut Bars
Ingredients
- 1 cup nuts, chopped (I use cashews and almonds)
- 1 ⅓ cups pitted dates, packed
- 1 teaspoon pure vanilla extract
- 3-4 tbs cocoa powder
- 3 tbs chocolate chips
- ⅛ teaspoon salt
Instructions
- Soak dates in warm water for 10 minutes to soften, longer if dates seem dry. Remove dates and reserve liquid. (See Note 1 below.)
- Add nuts to food processor and process until nuts are small pieces.
- Pour chopped nuts into a bowl and mix with cocoa, salt, and chocolate chips. Set aside.
- Add dates to food processor and process until it is a paste.
- Add date paste to the nut mixture and mix well.
- If mixture is too dry and isn't sticking together, add reserved date liquid, 1 teaspoon at a time, mixing well after each addition until everything just begins to stick together. (See Note 2 below.)
- Using the back of a spoon, press date nut mixture firmly into a parchment lined 8x8 pan or loaf pan, spreading evenly and to the edges.
- Refrigerate for at least 1 hour before cutting into bars.
- Store bars in the refrigerator. (See Note 3 below.)
Notes
- If the dates you are using are already soft and moist, you can skip the soaking step. Soak the dates if they seem a bit hard or dry, in which case, they may need more than 10 minutes.
- Be careful not to add too much water to the mixture when mixing all the ingredients together. If it's too wet, the bars will not hold together as well and you will also lose some of the chewiness. If you do not have any reserved liquid from soaking the dates, use water.
- If you want to turn these into energy bars, use coffee instead of water!
- Store the bars in the refrigerator. Wrap them individually to grab and go, or store in single layers separated by parchment paper in a sealed container.
- If you use an 8x8 pan, your bars will be thinner than if you use a loaf pan. Either way, you will get 8 bars or 16 squares.
- Use whatever nuts you prefer to substitute the ones in this recipe.
- Seeds, dried coconut flakes, or cranberries would make good substitutions for the chocolate chips
- Skip the chocolate chips if you want for a more even texture.
- You can also roll these into balls and coat them in a dusting of cocoa!
Nutrition
This post was originally published January 29th, 2017 and republished on January 5th, 2020 with new writing, photos, recipe notes, and instructional photos.

Priscilla Rivas
I added some orange zest to my bars and they came out amazing! Thanks for the recipe Lisa!
Ooooo! I love the sound of that, Priscilla! Orange zest sounds like a great flavor addition to the bars. Thanks for sharing the tip!
Sabrina
Wow! These are a nutrient packed delicious bite. These are really easy and wonderful to pack in our work and school lunches. Thanks for this great recipe!
Thanks, Sabrina! We love having them available to snack on!
Trish
These looked so good I immediately made a batch. They were perfect! Love these
Wow! That’s awesome you made them so quickly! I’m glad you liked them, Trish!
Cathy
I love snacks that are nutritious like this! It's also a real treat to eat, so it checks all the boxes!
Thanks, Cathy!
Katherine | Love In My Oven
We would love these bars!! Chocolate chip date is pretty much the most amazing combination! I'm pinning these and definitely trying soon!
Thanks, Katherine! I hope you like them!
Colleen
These bars are amazing, Lisa. Perfect texture, super tasty, so easy to make and healthy, too. Thanks for a great recipe!
Thanks, Colleen!
Allison
What a delicious and easy to make recipe! I am pinning this to try later, as I am always looking for tasty and healthy snack options without the wasteful packaging that comes along with store-bought bars!
Yes, that's another advantage to making these at home...no packaging for every single bar! I just keep the bars in a sealed container in the fridge!
Elaine
Absolutely delicious bars and I love that they are gluten-free! I like to add coconut. They're a great substitute for Lara bars.
Coconut sounds like a great texture and taste to add to the bars, Elaine! I used to love Lara bars...but the cost per bar was really too much.
Fouzia
Your date and nut bars look fabulous! And they are so nutritious and healthy and so easy to make! I don't think you'd ever want to buy from outside once you make them at home. I wouldn't. Thanks for sharing!
Thanks, Fouzia! I'm reluctant to buy bars now, especially when I see how much the cost or the ingredient list! Love being able to make these at home!
janine davies
These are so easy to make and enjoyed them so much we tried other flavours as well. Cranberry and white chocolate chips and orange and dark chocolate.Think they will become a family favourite.........
I'm so glad you liked the recipe, Janine, and thanks for sharing your variations. They sound so good!