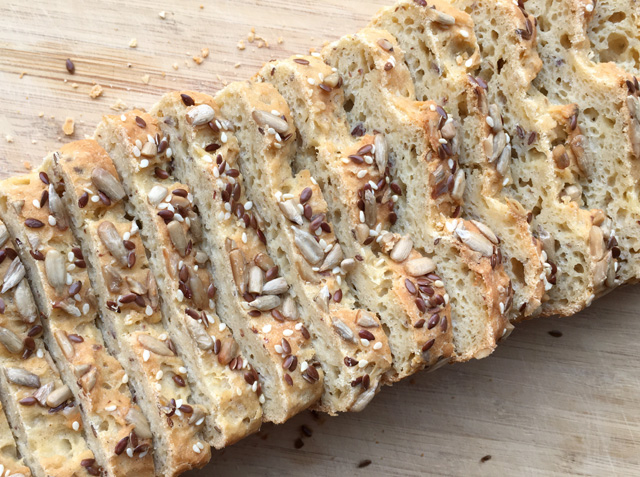
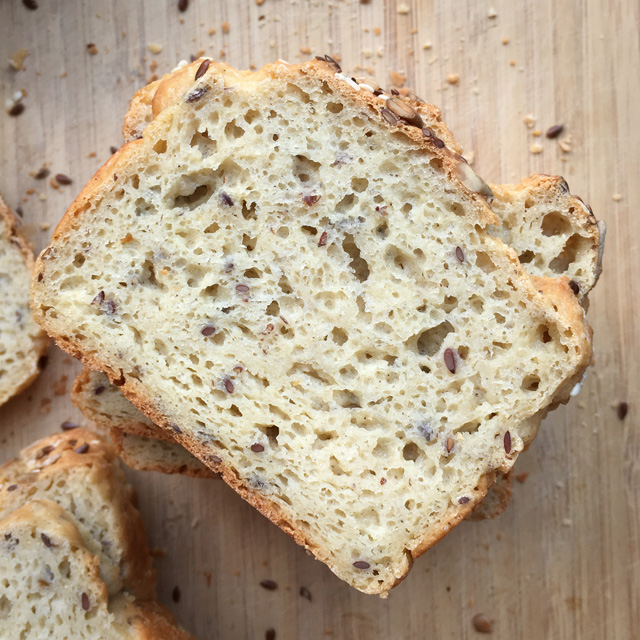
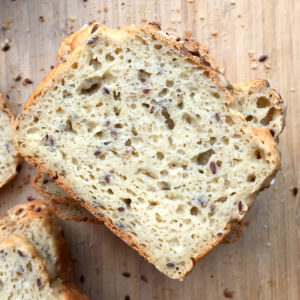
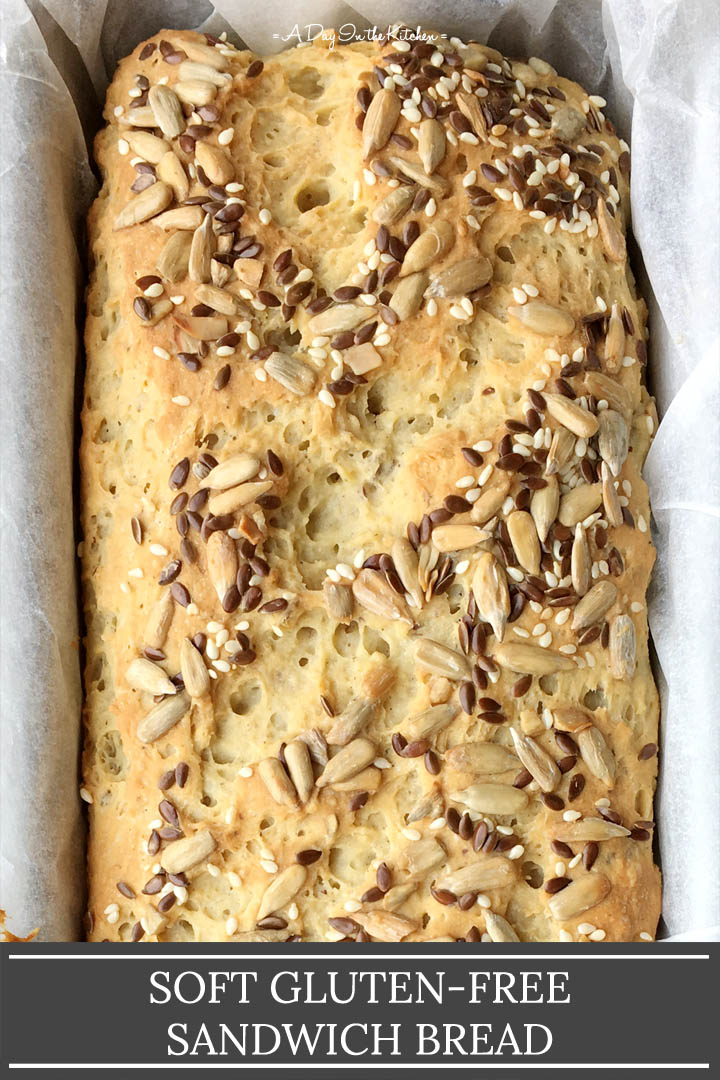
This gluten-free sandwich bread is how gluten-free bread should be! It's soft, tender, tasty, and just so good that you can't tell it doesn't contain wheat!
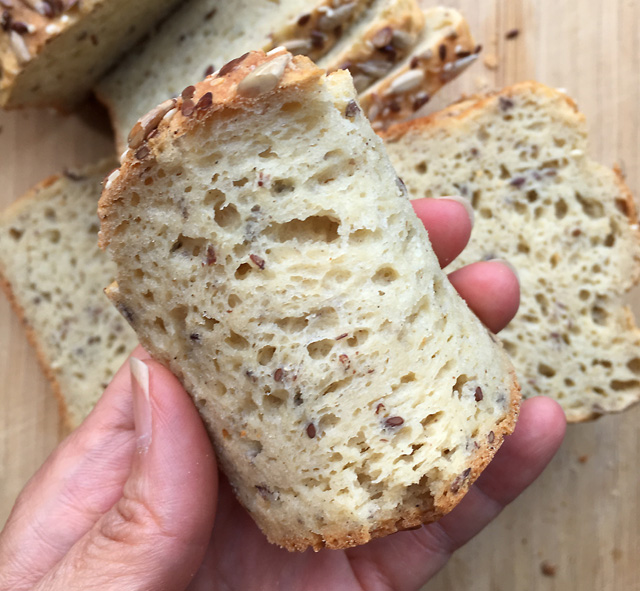
This gluten-free sandwich bread is soft and delicious.
Not words you'd ever associate with any gluten-free bread, right???
It's also a prime example of patience and perseverance because it took me a long time to get this right. A very. Long. Time.
My first attempt at making gluten-free bread was mediocre at best, and at first, I was quite excited about it.
But as I looked at it more, I realized it resembled a brick.
And oddly enough, it was heavy like a brick.
And if you ask my family, it was like eating a brick.
Okay maybe not. No one lost their teeth eating that very first attempt at gluten-free bread. 🙂
But were we excited about it? Not particularly. Did we finish the loaf? Uh...no.
And I could have given up.
But I didn't give up and my family is so glad I didn't!
It wasn't easy making that first loaf, having to figure out all the ingredients only to have it come out like something that could be used as a doorstop...or a paperweight.
What I wanted to achieve was gluten-free bread that someone on a gluten-free diet would love. I wanted to create a real, soft, squidgy bread and prove, once and for all, that gluten-free bread doesn't have to be dense, dry, and crumbly. Just about every gluten-free bread we ever bought was like cardboard...and they wouldn't brown in the toaster. What is that all about??
There are actually some gluten-free bread mixes out there that produce a decent loaf of bread. However, I didn't always want to rely on a pre-packaged mix if we wanted bread, and they aren't very affordable. Once I was able to develop this recipe, I never looked at a bread mix again!
I have made this bread several times and I never tire of watching a mix of basic ingredients transform to a beautiful loaf of bread. And then to have that bread be all soft and squidgy like "real" bread is incredibly satisfying and fulfilling.
Who'd a thought it was possible, right?
I certainly had my doubts, but I'm glad I didn't let my early failures deter me from getting to this result! And I have to say that my family was incredibly patient as I worked through each attempt, having to eat every single iteration. But it paid off and now my family likes my bread more than the gluten-free bread mix I used to buy! I call that a total success!
If you haven't tried making your own gluten-free bread yet, or if you haven't eaten any good gluten-free bread, you have to give this recipe a try! I've done all the research and work and you'll be amazed at how it's just like "real bread"! 🙂
~ Lisa.
Watch How It's Made!
Soft Gluten-Free Sandwich Bread
Ingredients
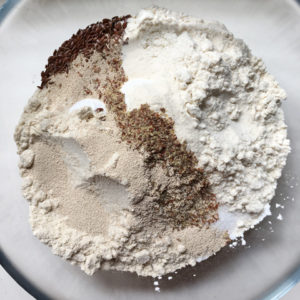
Dry:
- 225 g tapioca starch (same as tapioca flour)
- 100 g brown rice flour
- 75 g sorghum flour
- 1 tbs xanthan gum
- 1 tbs ground flax seed (can be omitted)
- 1 teaspoon whole flax seed
- 1 ½ teaspoon salt
- 1 tbs active dry yeast (instant yeast okay; see Recipe Notes below)
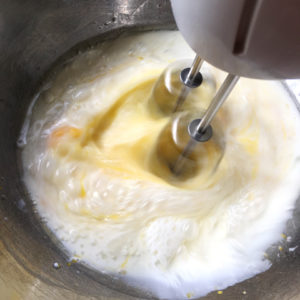
Wet:
- 1 ¼ cup milk warmed to 110 deg F (43C)
- 3 eggs room temperature
- ¼ cup light olive oil
- 2 tbs honey
Toppings (optional):
- 1 teaspoon whole flax seed
- 1 tbs sunflower seeds
- ½ teaspoon sesame seeds
Instructions
- Combine all dry ingredients in a bowl and stir together with a whisk; set aside.

- Combine milk, eggs, olive oil, and honey in mixing bowl; mix well.
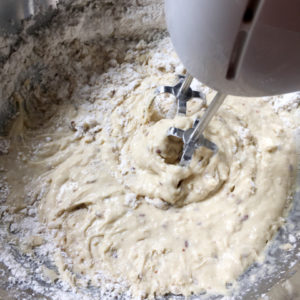
- Add dry ingredients to the milk and egg mixture and mix for 1-2 minutes. A paddle attachment, dough hooks, or hand mixer beaters will all work with this dough.
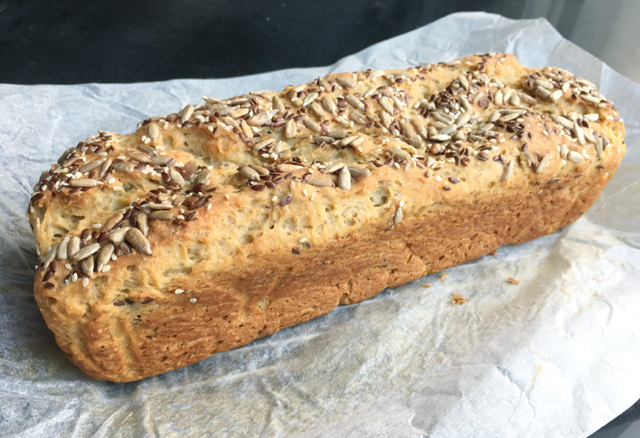
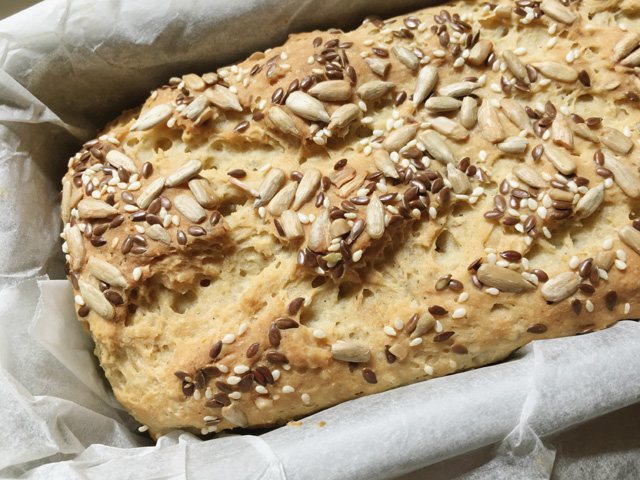
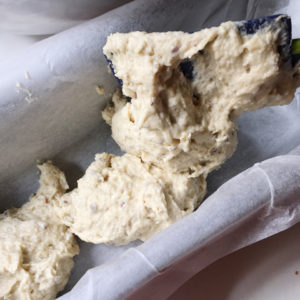
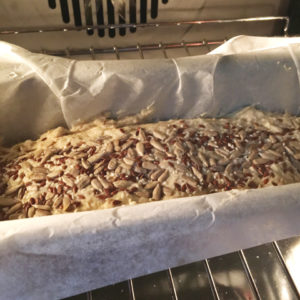
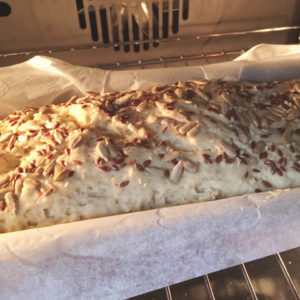
- Pour or scoop into a parchment-lined loaf pan. Make level with a spatula.
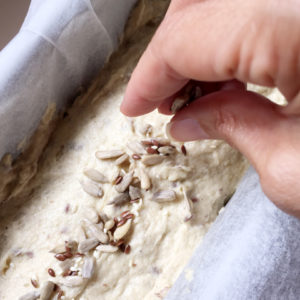
- Scatter whole flax seeds, sunflower seeds, and sesame seeds on the top of the dough.
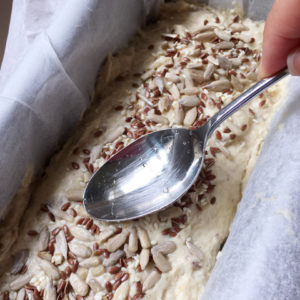
- Gently press seeds into the dough with wet fingers or the back of a wet spoon.
- Let the dough rise in the loaf pan in a warm draft-free location for about 1 hour (check at 45 minutes). Bread dough should be no higher than ½" above the edge of the pan. (see note below)
- Preheat oven to 350 deg F (180 C). The bread dough will be slightly "jiggly".
- Bake for 55 minutes. If you do not want the crust to overbrown, drape a piece of foil over the bread AFTER the first 35 minutes of baking (completely optional...see Recipe Notes below).
- Bread is done when the internal temperature taken with a thermometer is over 200 deg F (93 C). A temperature reading close to 210 deg F is even better (98 C).
- Remove from oven and let bread rest for 3-5 minutes.
- Using parchment, lift bread out from the pan and set on a rack to cool completely.
- Let cool completely before slicing.

Notes
- Volume Measurements:
- 2 ¼ cups tapioca starch
- ¾ cup + 2 tbs brown rice flour
- ¾ cup sorghum flour
- Please note that gluten-free recipes work best with weight measurements because they are more precise than volume measurements. Gluten-free baking requires more precision and can be less forgiving than baking with regular all-purpose wheat flour.
- These volume measurements were made from spooning each of the flours into the measuring cups/spoons (so they are not packed) and leveling them off.
- The volume measurements are approximate. Make slight adjustments to the recipe as needed, adding a bit of water or a bit more tapioca starch or brown rice flour to achieve the correct dough consistency.
- Liquid Measurements in Grams:
- 1 ¼ cup milk = 305 grams
- ¼ cup oil = 55 grams
- Volume Measurements in Milliliters:
- 1 teaspoon = 5 ml
- 1 tablespoon = 15 ml
- 1 cup = 250 ml
- The ground flax seed can be omitted if you have an allergy to it.
- You can substitute the milk in the recipe with water or nut milks without any problem.
- I add the active dry yeast directly to the dry ingredients without proofing.
- If you want to proof the yeast first, you can test it in ¼ cup of the warm milk/water with the honey before adding it to the dry ingredients with the remaining 1 cup of warm milk/water.
- You can use the same amount of instant yeast in place of the active dry yeast, but the bread may take less time to rise. Check how much the bread has risen after 30 minutes.
- In case I wasn't too clear in my description, the dough for this bread will not be like your typical wheat-based bread dough which you can actually handle. The dough will be more like a thick batter that you have to scoop into the pan. Do not worry if you see this as it is normal for some gluten-free bread recipes to be like this! Just scoop or pour the dough into the pan, even it out, let it rise, and then bake!
- Topping the bread with seeds is completely optional and can be skipped.
- Let the bread rise in a draft-free area on the counter. I also have let my bread rise in the oven with only the oven light on, carefully removing the bread to preheat the oven before baking.
- Covering the bread with foil while baking is an optional step if you do not want the bread to overbrown (it is still good if you skip the foil).
- If you cover the bread with foil, bake it UNCOVERED for the first 35 minutes and then cover for the remaining baking time. This will help reduce any chances of bread "shrinkage" while baking.
- Let the bread cool completely before slicing to avoid any gumminess.
- Store any leftover bread in a sealed bag or container for 2 days on the counter. If keeping for longer, keep bread slices in the fridge or freezer and then reheat in the toaster.
Nutrition
This post was originally published on May 21st, 2017, republished in November 2018 with new photos, instructional photos, slight recipe modifications, and updated recipe notes. Instructions regarding covering the bread with foil while baking and Recipe Notes were updated April 9th, 2021.


Erica
Hello Lisa;
First of all thank you for sharing.
I’m confused with one of the ingredients. It’s written tapioca starch in the list of ingredients but when you click on the link (on the name) it drives you to buy tapioca flour. Then I did not know if I should use the starch or the flour, could you help me with this? I used tapioca flour and It didn’t rise like yours 🙁
Hi Erica! Tapioca starch and tapioca flour are the same thing, so no worries there. As for rise, that would not have anything to do with the tapioca starch as it contributes more to texture. My only suggestion is to make sure that your yeast is active and also to give it enough time to rise. Depending on the conditions, it may take longer to reach the right height before you bake. I hope that helps, and thanks for your comments. 🙂
Kathy
What substitute can replace sorghum (and oat) as I have an intolerance to both?
Hi Kathy! You can replace the sorghum in the recipe with more brown rice flour. You can also try replacing it with buckwheat flour, although that will also affect the color of the bread. I hope that helps!
Lillie
This bread is incredibly soft and delicious. Unlike any other bread recipe I’ve tried. My only problem with it is that it collapses every time I b make it. It rises beautifully and bakes beautifully but always collapses. What am I doing wrong.
It's hard for me to know what is going wrong without being right there with you, but the first thing I can think of is that the bread might be rising too quickly, which can make for a weaker structure. You can try reducing the amount of yeast by a third, down to 2 teaspoons, and you can also make sure it's not rising in too warm of an environment. Gluten-free bread, in general, can also have a bit of shrinkage after it bakes, but without exactly knowing what you mean by "collapsing", reducing the yeast and making sure it's not too warm for the rise are the first things I would try. Thanks for the question, Lillie, and let me know if that helps.
Luz
What size bread pan do you use for a 10 serving loaf?
I used a loaf pan which is longer and slightly narrower than a normal loaf pan, but the size in volume is almost the same. Keep in mind that 10 servings is an estimate and can also depend on how thin or thick you cut your slices.
DEE
Thank you so much for this recipe! I must say, this is by far the best, most delicious and easiest gluten-free bread recipe I have ever encountered. I will definitely keep this recipe in my treasure chest.
Thank you so much, Dee! I appreciate your comments and am thrilled that you like the bread!
Cherie
This bread is delicious. I have made it a few times now and thank you so much for posting it.
Thanks for your comments, Cherie! I'm really happy to hear that you've had success with the recipe!
Debbie
My first try at any bread. I only had white rice flour and substituted the sorghum with oat flour. Seemed the substance worked ok because it turned out very soft and flavorful. Only issue was that the bottom and edges right next to crust were a little gummy. Perhaps I needed to cook longer but my thermostat said 210. Toasting it solves that issue though. Next time I’ll press the topping seeds in better as well because most fell off when I sliced it! I will definitely be making this again. Thanks.
Thanks for your comments, Debbie. The tapioca starch in the recipe helps to balance the heaviness of the rice and sorghum flours (or oat flour), so without it, that might explain the gumminess at the bottom. You can also try using cornstarch as a substitute if you do not have tapioca starch on hand, or reducing the xanthan gum to 2 teaspoons.
May Wong
Haha Lisa, your reply came just in time. I am preparing my ingredients, my 3rd round. Last time I added olives, sun-dried tomatoes, garlic, fresh rosemary, black pepper. Even my 2 elderly aunties love it! Thanks soooo much!
One more question: if the rise is too fast during proofing, because weather in HK is too hot, should I reduce the yeast ( active or instant) to half in ALL YOUR RECIPIES?
If your bread is rising too fast, I would start by reducing the yeast by a third...down to 2 teaspoons from 1 tablespoon...and see how that works for you. I would not necessarily apply that rule to all my yeast bread recipes since the amount of yeast varies among them, and I would only adjust on a case-by-case basis. And your variations to the bread sound amazing, May! Thanks for sharing!
May Wong
Hi Lisa, thanks for your reply. I guess some misunderstanding, your recipe calls for instant yeast but I only have active dry yeast. I googled the difference, suggested add 25% more than instant. That seems too much.
So if I use active dry yeast in this recipe, how much should it be?
Thanks again😊
Sorry for the misunderstanding on my part, May. Thanks for bringing the yeast ingredient to my attention. I've updated the recipe to say you can use active dry yeast, as that is what I use. I have also updated the Recipe Notes to explain what to do if you use instant yeast vs active yeast. I hope that helps!
May Wong
Hi Lisa, I have run out of instant yeast. If using active dry yeast, is it the same amount, 1 tablespoon? Thanks
Yes, May, you can use instant yeast. The bread may rise faster than it would with regular active yeast, though, so check on it earlier. Thanks for the question!
Arlene Mullen
Do you have to add Whole flax seed? I have ground but I don't really want seeds in the bread unless they are absolutely needed because my 8yr GF kid wont eat it
No, the whole flax seed is optional, as are any of the whole seeds in the recipe. Thanks for the question, Arlene.
Sheryl Nathan
Could this be made in a bread maker - I don’t have an oven.
I think it could work in a bread machine, Sheryl, but you have to make sure that it only goes through one rise before baking and not two. If you try it, please check back in and let me know how it turns out as I am curious if it works!
May Wong
Hi Lisa,
This bread is ‘real’, I love it. Thanks for sharing your recipe. Both structurally and aesthetically is better if using the pan size as yours than 9”x5” pan. I only proved the bread for 15-20 mins, it had already risen over the edge a bit. I also mix 1 Tbsp each sunflower n flax seeds into dough. Will be my go-to bread.
Wow...that is a very fast rise! If you want to slow the rise down a bit, you can reduce the yeast to 2 tsp so it has a longer time to build structure, or place your bread in a cooler location for proofing. I'm so glad you like it, though...it's definitely one of our favorites!