Make roast pork belly right in your own home! This iconic Chinese dish is famous for juicy, tender meat and crispy, crunchy skin. It's a magical combination and a total delight for the senses and taste buds!
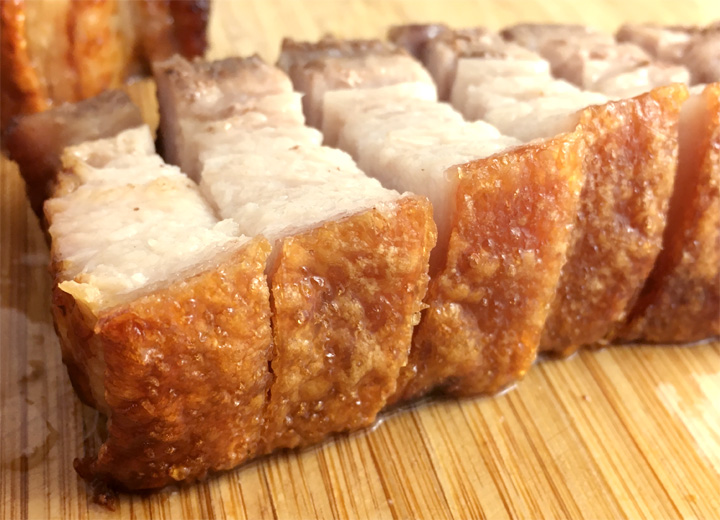
Crispy, crunchy pork crackling and tender, juicy meat.
It's a fabulous combination that is iconic of Chinese crispy roast pork belly, or siu yuk (siew yook), as it's called in Cantonese.
I can remember eating it waaaaay long ago when I was a little kid. I didn't have so much of it when I lived in California, but now I live in Hong Kong where I can find it everywhere and anywhere!
Not all of you live in Hong Kong, though, or near a place where you can buy it.
So the next best thing is to make it yourself!
This is a slightly longer recipe post than others I have written, but I really wanted to explain how and why I do what I do. You can also skip on down to the recipe and just get cooking!
How To Prepare the Pork Belly
I have tried several different recipes, highlighting different methods and techniques and with varying results, and I have come up with what works well for me.
Poking the Skin
Poking the skin with many many many holes is one factor that helps give the skin its bubbly looking texture. I use the tip of paring knife to poke all over the skin. You can use one of those meat tenderizers with the steel pokey blades, the tips of metal skewers, and you can even use an ice pick or toothpick. Whatever tool of choice you decide to use, the important thing is to not poke too far beyond the skin itself as you do not want the fat or juice to bubble up and pool on the skin, preventing it from actually crisping.
A fork, by the way, does not have sharp enough tips to pierce the raw skin.
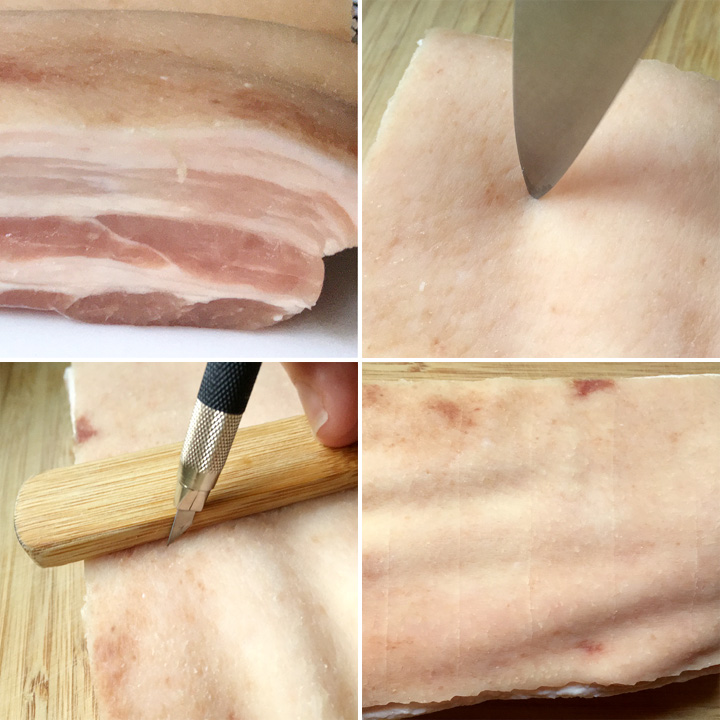
From there, I also score a few lines into the skin. This step isn't necessary, but I do it to aid with cutting the belly into chunks later. I use a very sharp blade (that I've reserved for kitchen-use only) and using the straight edge of a wooden spoon, the edge of a baking pan, or a ruler, I score the skin about 1" or so apart. Again, it's important to only score the skin and not go to far into the meat or fat.
You can also completely skip the poking step and you will still end up with crunchy crackling, but it will not be as bubbly or "puffy".
Preparing the Meat
I flip the slab of meat over and I make cuts into the meat that only go halfway down and that are perpendicular to the score marks I just made in the skin. This is another step that is not necessary and completely optional, but I find it makes it a little easier when cutting the pork belly after it is cooked. This will all make sense later. 😉
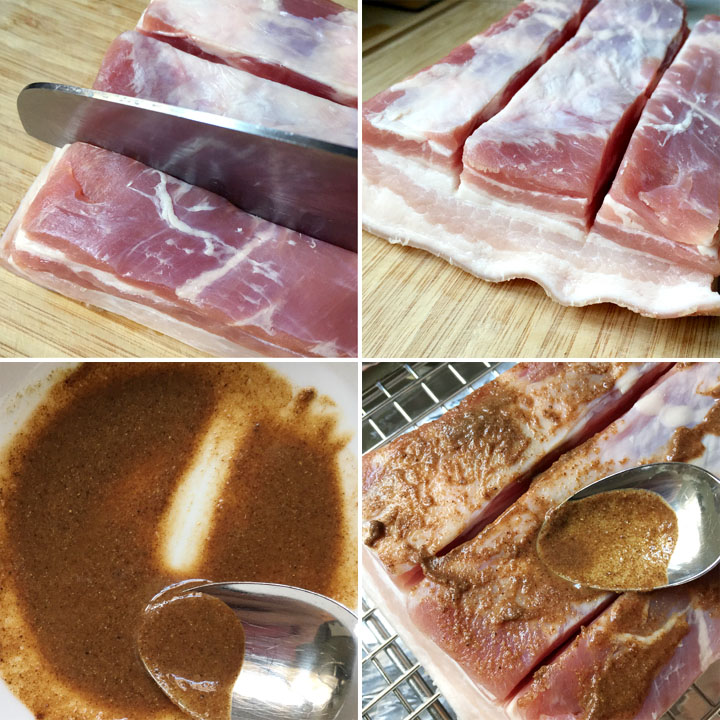
With all the poking and scoring and cutting done, it's time to rub some marinade into the meat itself for flavoring. I use a combination of Chinese cooking wine, salt, white pepper, and 5-spice powder. I mix it all together and then rub it into the meat side only. Do not get any on the skin.
Drying the Skin Out
The key to nice crisp crackling is to make sure the skin is as dry as possible. This is a two step process.
Firstly, pat the skin dry with paper towels, and then sprinkle salt all over the skin. Rub it in with your fingers and immediately, you will notice your fingers getting wet. The salt draws moisture out of the skin and the effect is immediate.
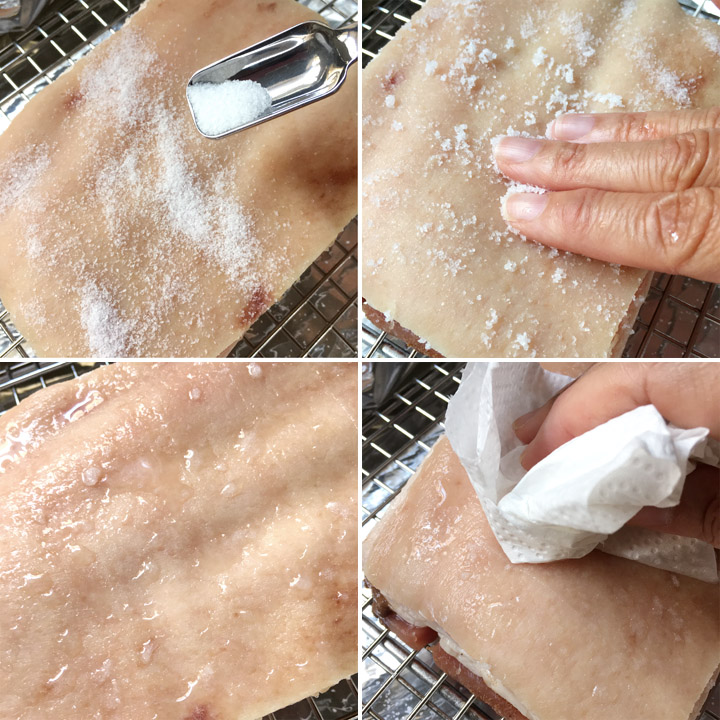
Let the pork sit with the salt for approximately 20 minutes and you will find that there are now POOLS of water on the skin. That's just from the salt! Pat the skin thoroughly with paper towels to wipe away the moisture that has been drawn out.
Now it's time to put the pork in the fridge, uncovered for at least 12 hours, overnight being best. This step, I have found, should not be skipped.
I have tried recipes where they did not give the skin time to dry out and, even though they somehow came up with picture perfect pork crackling, it never seemed to work for me. So I'm going with what has worked reliably for me. Letting the pork belly skin dry out, and giving it enough time to do so, will give you the best results...ie crisp crackling!
Roasting the Meat
Before you roast the meat, use a paper towel to wipe off any salt and moisture that remains on the skin. Then place the meat on a rack in a foil-lined pan to allow fat to drip off and to prevent the bottom of the meat from becoming hard and tough from having contact with the pan.
Roast the meat in a 350F/180C oven on the middle rack for about an hour. Roasting at a lower temperature to start cooks the meat without drying it out.
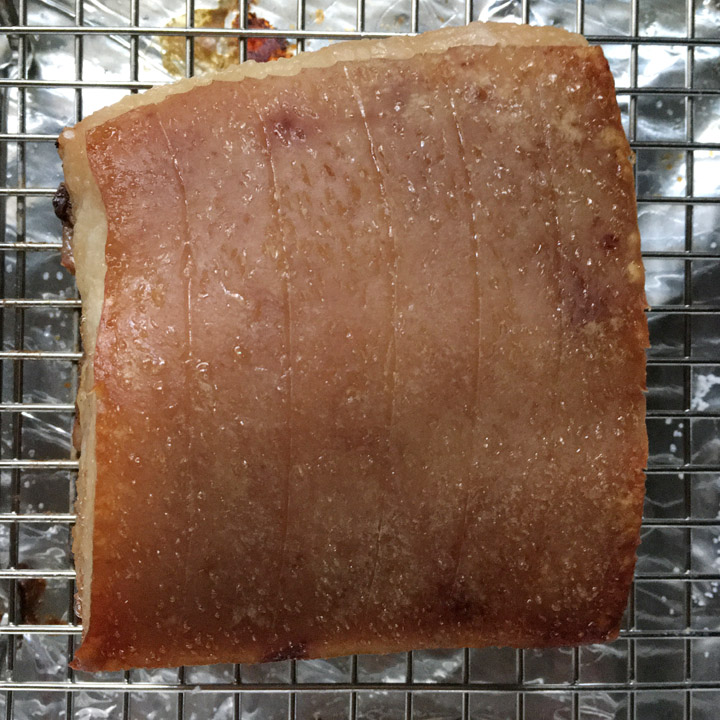
After an hour, it's time to remove the pork from the oven and increase the temperature to 450F/230C. The skin at this point won't look particularly appetizing and is far from crispy and crunchy. I pat the skin dry with paper towels again, just in case. Remember, dry skin is good!
Place the roast back in the for anywhere from 10-25 minutes...until the skin has "bubbled" up and is crisp. Every oven is different, so you should check how the skin is doing every 5 minutes after the first 10 minutes have passed. You want crisp skin, but you do not want burnt skin.
And voila!
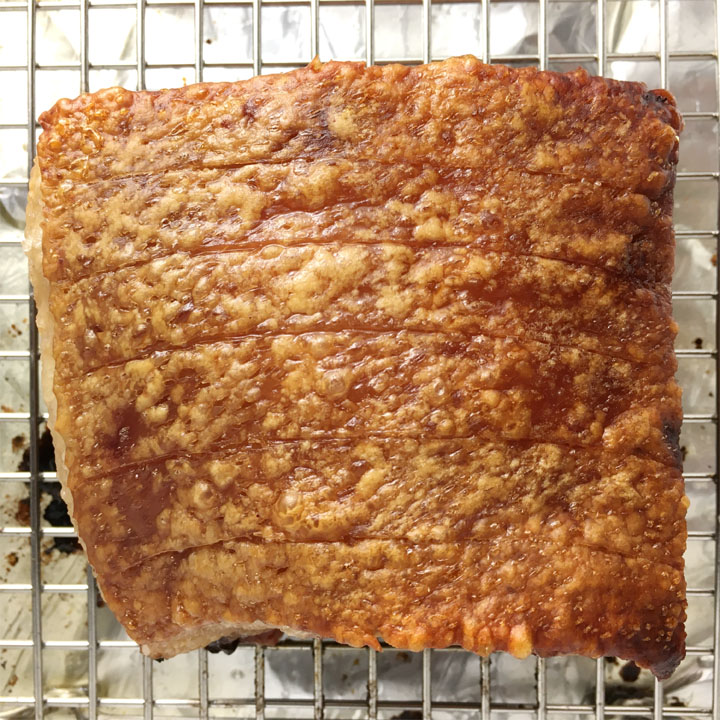
It is an incredibly satisfying sound to run the edge of a knife along the top of the skin and hear it scrape against the hard crisp surface. That is when you know you have done it!
Chopping the Roast Pork
Allow the meat to rest about 15 minutes before you start chopping it.
I lay the pork belly, skin-side down on a cutting board and place my knife into those cuts I had made into the meat. Saw through the meat and then when you hit the crispy skin, simply push down really hard to cut through it. Repeat with the remaining cut in the meat.

Remember the scores I had made in the skin? Now I line my knife up with those score marks and chop down, resulting in my chunks!
Again, all the pre-cuts/scores are not necessary, but I find the pieces of pork belly come out a lot nicer looking and the crackling is less likely to separate from the meat (not that that matters if it does, of course). I also do not have anything near the skill of a Chinese butcher who can expertly chop up a whole side of pork with force and precision with every whack of his knife!
What Do I Serve With It?
Serve this with hot steamed rice and some leafy greens. It would also go great with other Chinese dishes like BBQ Pork Chow Mein, Rice Porridge Congee, or Egg Drop Soup. It goes well dipped in some hot Chinese mustard or a Thai style sweet and sour chili sauce.
I also like serving the roast pork belly with my Pickled Daikon and Carrots. With its refreshing cold crunch and sweet and sour flavor, the pickled vegetables create a perfect flavor partnership with the salty pork.
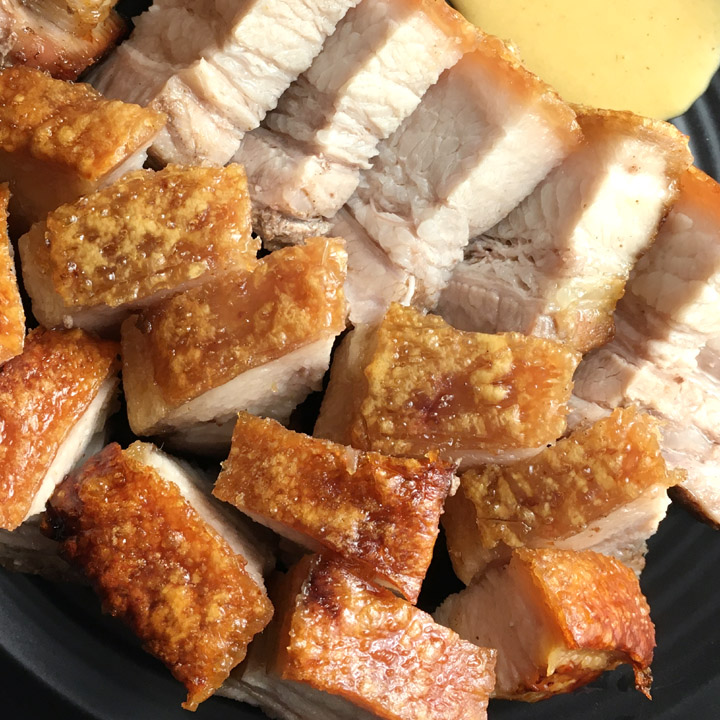
Eat the roast pork belly the day it's made as leftovers really do not fare well. The meat will dry out and not be as juicy or tender when reheated and the crisp crackling that you went to so much effort to make will soften and become chewy. I have seen recipes where they give tips on how to reheat the crackling by itself in the oven to crisp it up again, but I, personally, don't think it's as good as when it is first roasted.
And there you go! There are many many many roast pork belly recipes out there and several different ways of making it. Thanks for taking the time to see how I make mine, and I hope it encourages you to try it yourself at home!
~ Lisa.

Crispy Roast Pork Belly (Siu Yuk)
Ingredients
- 500 grams pork belly with skin on
- 1 teaspoons salt
Meat Marinade:
- 1 teaspoon Chinese cooking wine
- ¼ teaspoon salt
- ¼ teaspoon white pepper
- ¼ teaspoon 5-spice powder
Instructions
- Place a rack in a foil-lined baking pan. Set aside.
- Rinse the pork belly under cold water and then pat dry thoroughly with paper towels.
- Place pork belly on a cutting board, skin side down, and make 2-3 cuts, about 1" apart, cutting only halfway into the meat.
- Flip pork belly, skin side up, and poke all over with a the tip of a paring knife, skewer, toothpicks, etc., being sure not to poke any holes too far beyond the skin. You want holes that only just break the skin.
- Using a clean sharp blade and a ruler or straight edge, score lines into the pork belly skin, about 1" apart. Again, be careful not to cut too far into the flesh.
- Mix all marinade ingredients together in a bowl.
- Flip the pork belly back over, skin-side down, and rub the marinade all over the meat, being careful not to get any marinade on the skin.
- Place the pork belly, skin-side up on the rack in the pan.
- Sprinkle 1 teaspoon salt evenly over the skin, gently rubbing the salt in with your fingers.
- Let the pork belly sit for about 20 minutes. Blot off any accumulated moisture/water from the skin with a paper towel.
- Place the pork belly in the pan into the fridge overnight, or at least 8 hours.
Roasting the Pork Belly:
- Preheat oven 350F/180C and place the oven rack in the middle of the oven.
- Use a paper towel to wipe off all the salt and thoroughly dry the pork belly skin.
- Roast pork belly uncovered for 1 hour.
- Remove pork belly from the oven and turn the oven temperature up to 450F/230C. Blot pork skin with a paper towel to soak up any moisture that may have accumulated.
- Put pork belly back into oven and roast for 10 minutes, or until skin is puffy and crisp, checking every 5 minutes.
- Let pork belly rest uncovered for 15 minutes.
- Place pork belly skin-side down on cutting board and cut into strips, using the cuts you made in the flesh. Saw through the meat and then press down hard with the knife through the crisp crackling.
- Chop each strip into chunks using the score marks you made in the skin as a guide.
- Serve with hot yellow mustard.
Notes
- I place the entire baking pan with the pork on the rack in the fridge to dry so that I can transfer the entire thing to the oven. If you do not have enough space in your fridge, simple place the pork belly on a dish and then transfer it to a rack in a pan when you are ready to roast.
- You do not have to poke the pork skin to get crisp crackling, but it will not bake up as much with the "bubbly" texture.
- Making the pre-cuts in the meat and the scores in the skin are completely optional steps and do not affect the overall results once the pork belly is cooked.
- The pork is best eaten on the day it is made. The texture of the meat will not be as good when leftovers are reheated and the crackling will be soft and chewy.
- Recipe developed/inspired/adapted from several sources including, but not limited to, Recipe Tin Eats, Marion's Kitchen, Hot Thai Kitchen, The Woks of Life, and numerous cooking videos.



ashok
My Family Loved it. I am definitely sharing Guys, Thanks For sharing this Great Recipe. this recipe and this website with my friend. Hope they also love it. Thank you again for sharing such a great recipe.
Thanks!
Sean
I've wanted to tackle this for a long time, but it always seemed a bit intimidating. Your layout and instructions are so clear and easy to follow! You make it feel wonderfully manageable - and you make it look incredible to boot!
Thanks so much, Sean. I found it intimidating, too...and now I've made in several times! I hope you'll tackle the recipe some time!
Shailaja
We Love Pork belly and this looks so crispy and perfect! Great share Lisa:))
Sharon
Fabulous! This is the real deal here, Lisa. 🙂 I have worked with more than one chef who worships pork belly and you have done them proud with this tutorial. Super useful tips and step by step images!
Wow...thanks, Sharon!
nancy
thanks for sharing Lisa! This looks so crispy!! I love it on everythign!!!
We made Siu Yok the other night too in an air fryer! Y
Nice! I've heard that it works in an air fryer!
Colleen
Lisa, this is such a helpful post! Since having to eat gluten-free, one of the things that I miss so much is Chinese food, and I'm excited to make this recipe. It looks so good!
Thanks, Colleen! I do hope you'll give it a try!
Vanessa
I have always been intimidated by pork belly. This post is super helpful. Thanks!
I know what you mean, Vanessa. I was the same, and then I just decided to try it! I hope you will, too!
Wanda
We love pork belly! Our Vietnamese student makes a tasty caramelized variation that I must learn how to make. I will definitely try this version!
Thanks, Wanda! Caramelized pork belly sounds delicious, too.