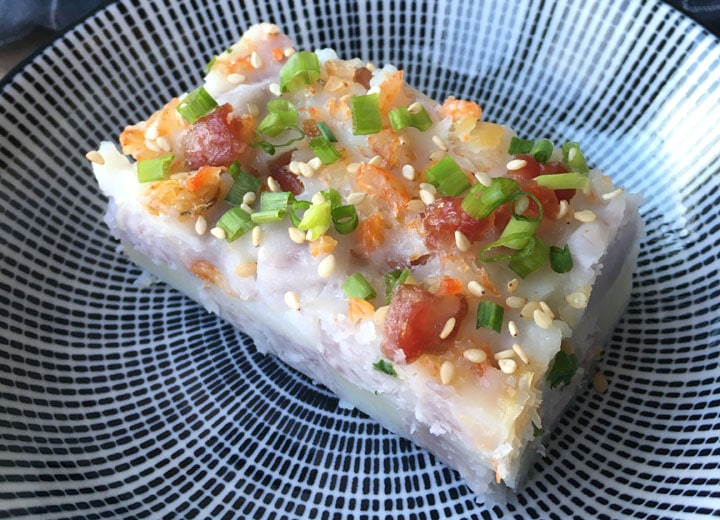
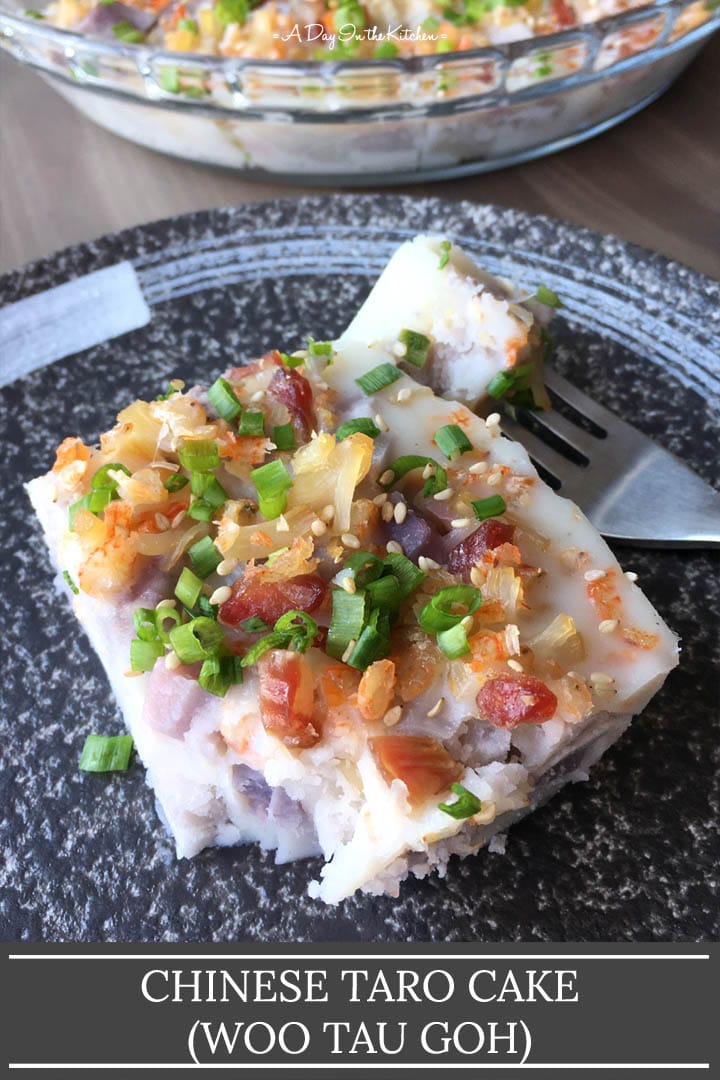
A traditional dish often served for Lunar New Year, this Chinese taro cake is loaded with flavor thanks to umami-rich tasty toppings! It's a tradition definitely worth keeping up!
I know. You're wondering, "What in the world is taro cake?"
Admittedly, it doesn't exactly sound particularly appetizing. And you're probably questioning my sanity.
I can assure you that I am completely sane and that, despite the name, Chinese taro cake is actually quite delicious!
Food often plays a huge part in a culture's celebrations, and this Chinese taro cake, or woo tau goh (woo tao go) is no exception. If you are of Chinese descent and from my generation or earlier, you are, most likely, already familiar with this traditional Lunar New Year dish and hopefully, it conjures up fond childhood memories as it does for me!
My mum used to make these every year and I haven't eaten her taro cakes since I left home. Here in Hong Kong, taro cakes are showing up in abundance as we near Chinese New Year...but they never look the same as my mum's. So I was determined to try and figure out how to make this recipe myself, not only to relive some delicious food memories, but also to try and carry on my mum's version.
Let's break it down!
The Taro Root
Taro is a root vegetable that is most often compared to being like a potato. The dark brown, almost "furry" type skin is best removed with a knife. I simply cut the taro root in half cross-wise, set each half on its flat base, and then start cutting away the skin from top to bottom. I have read online about how your skin can get irritated when when handling taro. While I did not have any issues, you can always use gloves in this case.
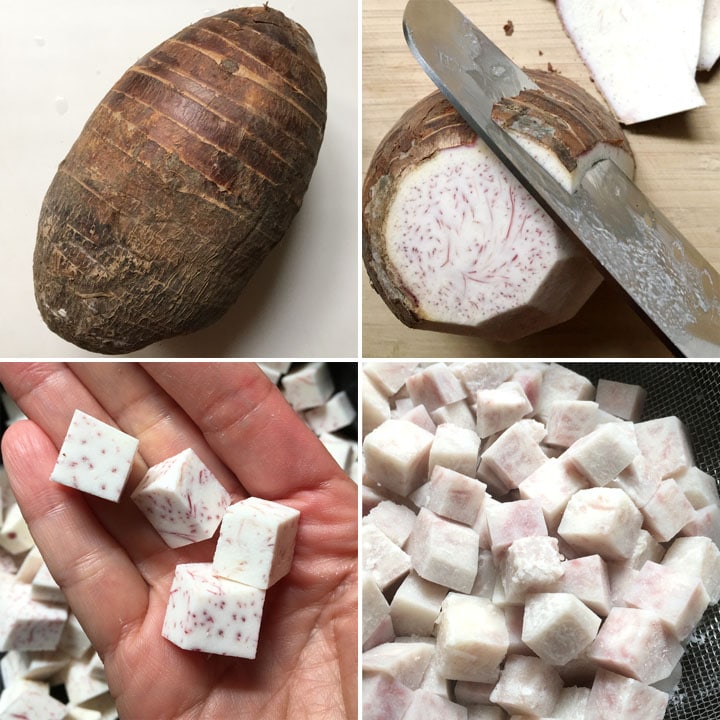
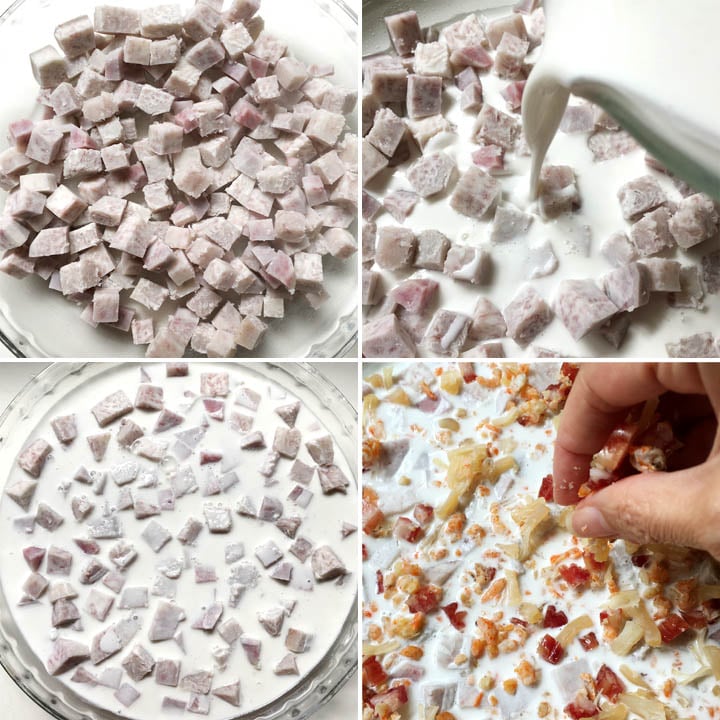
Cutting away the skin will expose the whitish speckled taro root underneath which you can then cut into small cubes. I boil the cubes for a couple of minutes to help ensure they cooked through in the final product, and once cooked, the taro root takes on a slight purplish hue.
The Tasty Toppings
The toppings are, I think, THE best part of taro cake because of the flavor-packed punch they give the dish. All the toppings are incredibly flavorful and full of umami, or that deep satisfying savory taste that always hits the spot.
Dried shrimp and scallops are used in this recipe, but they require a bit of preparation before using. (See note below.) Soaking them in hot water for a while will rehydrate them, and that soaking water will end up being mixed with the rice flour to make the rice flour solution. Basically, you don't want to toss that flavorful water!

Chinese sausages, or "lop cheng" are the other umami-packed topping ingredient and one of my favorite Chinese foods. I give these sausages a rinse under hot tap water to clean them off and to make them easier to handle when I chop them into small diced pieces.
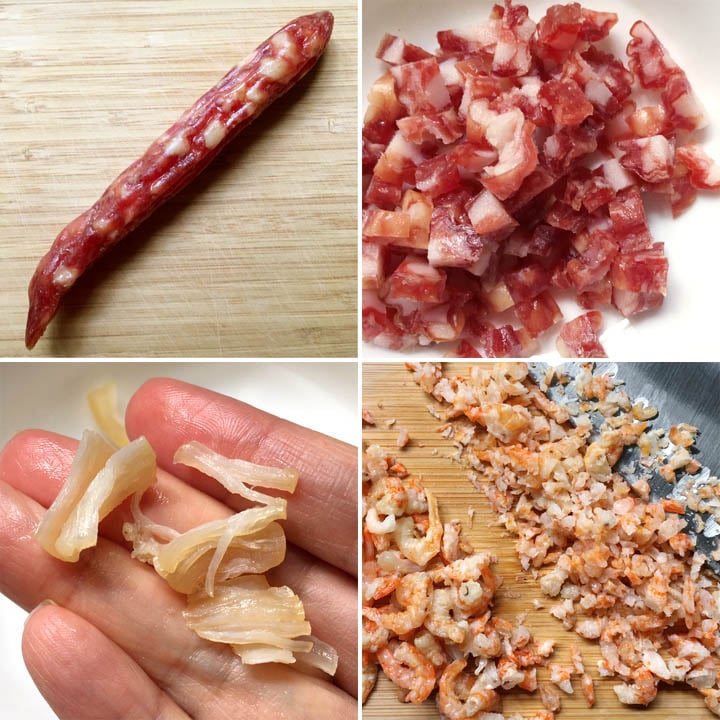
After the shrimp and scallops are rehydrated, I pull apart the scallops into shreds using my fingers, and I chop the shrimp roughly into small pieces. I then combine the shrimp, scallops, and Chinese sausage together and put it aside until I'm ready to use them.
The Rice Solution
The "cake" part, or glue that is going to hold everything together, is made up of a mixture of rice flour, salt, white pepper, and sugar and the liquid used to soak and rehydrate the dried shrimp and scallops.
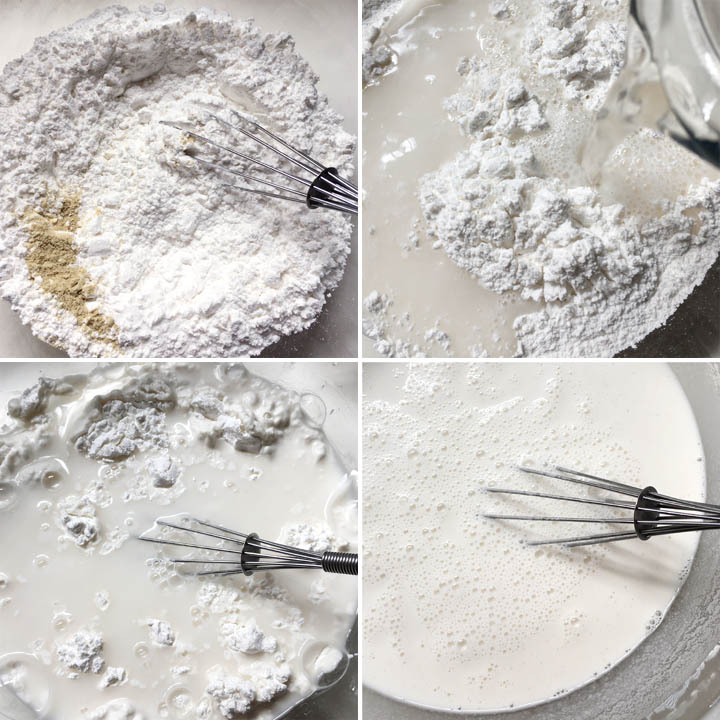
The dry ingredients and the soaking liquid get whisked together until slightly thickened. There is not much in terms of seasonings that go into the rice flour solution except for the salt, pepper, sugar, and soaking liquid, but you don't need much as you will get a bunch of flavor from the toppings.
Optionally, you can add ½ a teaspoon of fish sauce to the solution to add more overall umami flavor to the cake.
Note about the liquid: I warm the reserved liquid in the microwave before adding it to the rice flour mixture, but I do not want the water to get HOT as this may end up cooking the rice flour and making it turn into a clump that won't separate. 30 seconds should be enough.
Taro Cake
Now it's time to put it all together and cook it!
I spread the cooked taro root in a deep pie dish, but you can use any dish that is large enough to hold everything. I have used an 8x8 baking dish as well as a loaf pan with great success.
The rice solution is then poured over all the taro root, and finally, the savory toppings are scattered evenly over the surface. Sometimes I will push the toppings in a bit to make sure they get embedded in the cake while steaming.
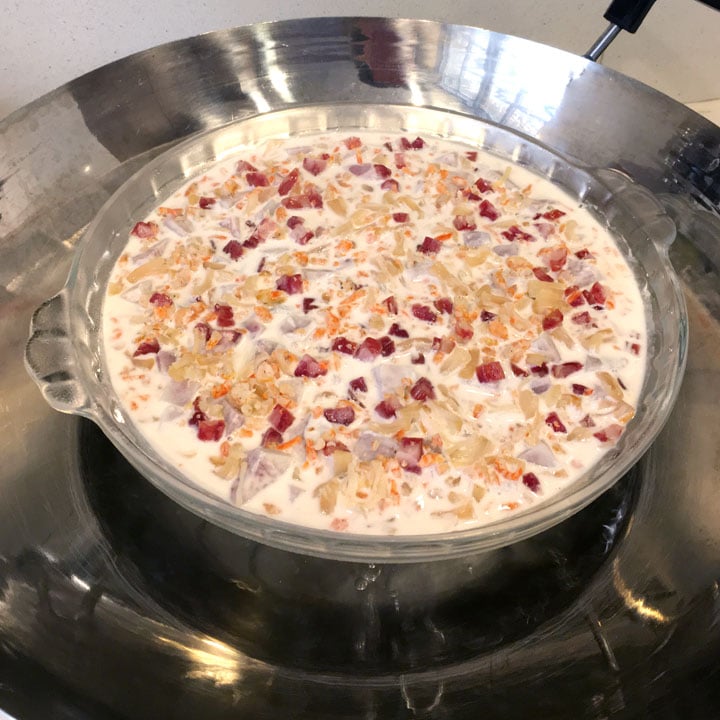
My steamer set-up is a wok with a rack at the bottom and I simply add water to the wok and bring it to a medium boil. I set the dish on the rack and put the lid on the wok and let the taro cake steam.
And here is a before and after! The left is pre-steaming, and the right shows the finished product after an hour of steaming.
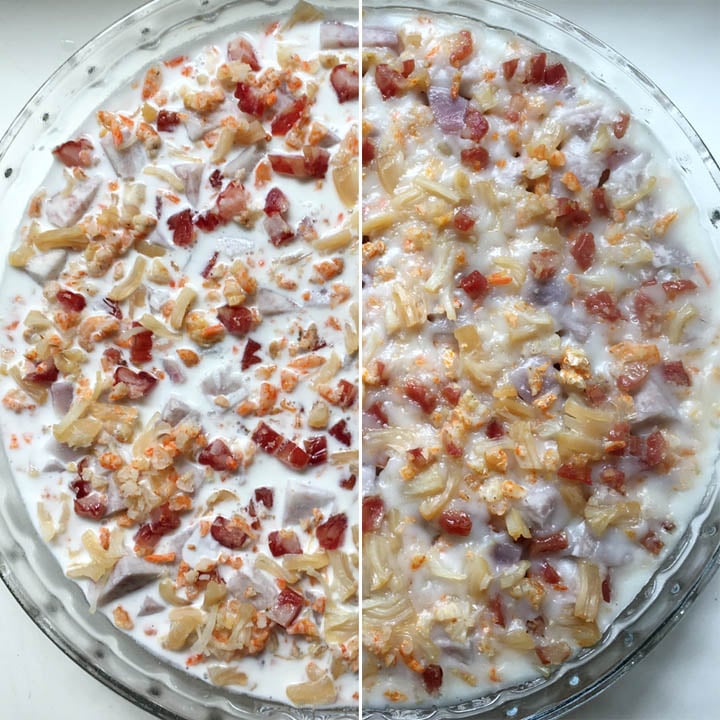
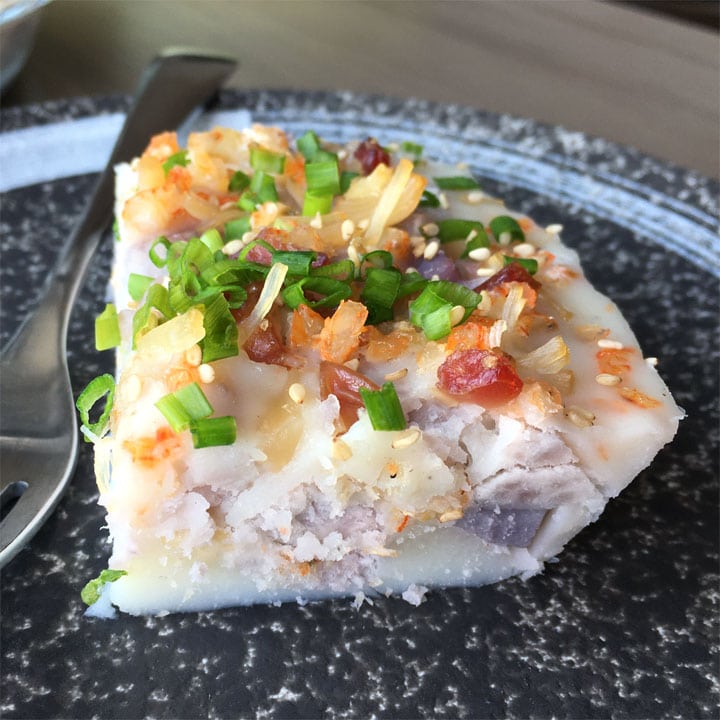
As you can see from the photo, the rice flour liquid has congealed and solidified, becoming a "cake" and marrying the taro root and toppings together.
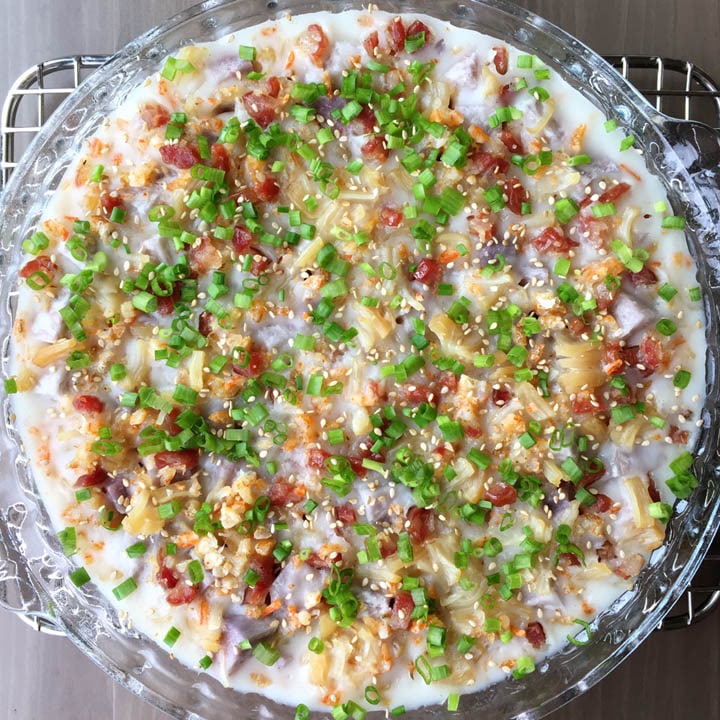
You could certainly eat this as is, but memories of my mother's always had bright green chopped green onion and sesame seeds sprinkled on top. And really...it makes it look so much nicer and appetizing! It's those little touches that make all the difference!
This Is My Mum's Version
My mum used to make this every year for Chinese New Year and I loved it. There mere sight of this brings back so many memories.
Keep in mind that this recipe is different than the majority of taro cake recipes online or that you will find being sold in shops. Furthermore, there are different variations of taro cake depending on which region of southeast Asia the recipe originates from.
Most recipes online involve cooking the savory ingredients with the cubed taro root in a pan and rice flour liquid, creating a thick paste that then gets scooped into a dish before steaming. There are no toppings that are added at the end of the steaming and you simply end up with a cake or loaf. The cake then gets cut into thick slices and are pan-fried before serving...that is how you will often get it at dim sum restaurants.
However, that's not how my mum did it.
Going from childhood memories, I remembered watching her ladle the rice solution into the dish, not cooking it into a paste. I remembered her laying the savory toppings on top, not having them buried in the cake. And I remembered how they looked, their texture, and how they tasted...I was thrilled when I got mine to look like hers used to. And when I got the flavor? I was so ecstatic, I couldn't wait to write this up for the blog!
As the ultimate form of praise, my sisters showed my mum photos of my completed woo tau goh, and when I spoke to my mum on the phone, she expressed her approval! She said it looked very pretty, that I did it right, and that I was much more dedicated than she because I made sure to chop the toppings so small, making it easier to eat. She explained how it was a lot of work when she used to make it (she would make several pans at a time!) and how she wasn't able to do it anymore. She seemed quite pleased that I knew how to make it, which gave me a great deal of satisfaction and sense of pride in being able to recreate my mum's taro cake.
Please note that getting a compliment, ANY compliment from a Chinese mother from her generation does not come easily! So this is huge!

Thank you for indulging me in sharing this recipe! This is a very traditional Chinese dish, but one that I love and didn't want to forget, and what better place to keep it but on the blog? If you're looking for other Chinese recipes inspired by my mum, check out Mom's BBQ Pork Chow Mein or her Noodle Egg Foo Young. If you're looking for another traditional celebratory dish, check out Savory Chinese Winter Solstice Soup, another recipe also inspired by what my mum used to cook.
And just because it's worth mentioning, this dish can be considered gluten-free! No soy sauce, no wheat, no gluten. It's an added bonus you weren't expecting, right?
Whether this dish brings back memories of your childhood or you're intrigued about what Chinese taro cake is like to eat, I hope you'll give it a try and enjoy it as much as I do!
Happy New Year! 🙂
~ Lisa.
Watch How To Make It!

Chinese Taro Cake (Woo Tau Goh)
Ingredients
- 180 g rice flour
- ½ teaspoon salt
- ½ teaspoon sugar
- ¼ teaspoon white pepper
- ¾ lb. (340g) taro root cut into small cubes (weight after peel has been removed)
- 2 cups hot water (for soaking dried shrimp and scallops)
- 3 tbs (25g) dried shrimp
- 3 tbs (30g) dried scallops
- 2 Chinese sausages (lop cheng)
- Chopped green onions
- Sesame seeds
- ½ teaspoon fish sauce (optional for stirring into rice solution)
Instructions
- In mixing bowl, combine rice flour, salt, white pepper and sugar. Whisk together and set aside.
- Add dried shrimp and scallops to 2 cups hot water and let soak until full hydrated, at least 1 hour.
- Drain rehydrated shrimp and scallops, reserving soaking liquid.
- Run Chinese sausages under hot water to help soften and to make easier to cut. Chop sausages into small diced pieces.
- Roughly chop shrimp; break scallops into shreds using fingers. Combine with chopped Chinese sausage; set aside.
- Combine cubed taro root and water in a pot over medium-high heat and bring to a boil. Simmer for 2 minutes. Drain.
- Measure out 1 ½ cups of reserved soaking liquid and warm up slightly in the microwave, about 30 seconds. (See Recipe Notes below). Add to bowl containing rice flour mixture and mix well with a whisk.
- Spread cooked taro root in greased dish. Whisk rice flour mixture again and pour over taro root.
- Sprinkle shrimp, scallop and Chinese sausage mixture over the taro and rice flour liquid. Gently push toppings into liquid so they are at least partially submerged.
- Steam for 30 minutes over medium heat.
- Top with chopped green onions and sesame seeds.
- Let cool completely before cutting. Eat at room temperature or microwave individual servings. Serve with chili sauce or soy sauce. if desired.
Notes
- Volume measurements for the rice flour is approximately 1 ½ cups, with the rice flour loosely scooped. *Using the weight measurement as stated in the recipe is more accurate and will yield more reliable results.
- Be sure to use regular rice flour and not glutinous rice flour.
- When reheating the reserved liquid before adding to the rice flour mixture, you do not want it hot, only warmed slightly. Microwave for just 30 seconds.
- Do not worry if the rice flour clumps a bit when you start to whisk it with the warmed liquid. Gently shake the whisk to loosen up the clumps and continue to whisk until smooth.
- I used a deep dish pie plate, but you can also use an 8x8 dish, a loaf pan, or another circular dish of similar volume. Round foil pans are traditionally used as the cakes are often gifted to family and friends for Chinese New Year.
- You can find taro root, rice flour, Chinese sausage (lop cheng), dried shrimp, and dried scallops at your local Asian market.
- Dried shrimp and scallops can vary in size. I bought small ones as they were more affordable than larger ones, but whatever you can find will do. Because of the variance in size, it is best to go by the weight measurement in the recipe to determine how much to use.
- Using Chinese mushrooms for your topping will add extra flavor to your taro cake.
- Purchase dried Chinese mushrooms from your local Asian market and, depending on the size of the mushroom, use 2 large ones and 3-4 small ones.
- Rehydrate them in hot water for 1-2 hours until fully hydrated. Remember to reserve the soaking liquid!
- Trim off the mushroom stems and finely dice the mushroom caps. Mix with the lop cheng, shrimp, and scallops to spread on the taro cake.
- Combine the soaking water from the mushrooms and the shrimp and scallops, and the measure out the correct amount for the recipe.
- You can add ½ teaspoon of fish sauce to the rice solution to add more of a umami flavor to the cake. This is optional.
- I steam the taro cake over medium heat, enough to keep the water at a medium boil. You do not want it at a full rolling boil over high heat, and you do not want the water simmering over low heat.
- Check the water level halfway through steaming and refill with hot water, if necessary (I use hot water I have just boiled in a kettle).
- The taro cake is best eaten warm. Store leftovers in the fridge and then reheat individual servings in the microwave
- You can freeze taro cakes! If planning to freeze, omit the chopped green onion garnish. Let cake cook completely, cover and seal well, and store in the freezer. When ready to use, remove covering and steam until completely heated through, approximately 30 minutes. Garnish with chopped green onion at this point.
** Instructions updated March 22nd, 2024, reducing steaming time to 30 minutes from 1 hour.
Susan
I Love wu tay, my parents are from Taishan or Toisan and made this all the time. They never made lo baok hoh which I don’t like as much. She made hers by steaming a layer of rice mixture on the bottom of the pan and sautéed the scallions with the chopped food mix. Otherwise it’s all similar but nice to have a recipe. I eyeballed it once and it tasted good but needed another practice round do I will use your recipe 👍🌸 thanks. My cousins are in BC and I work in China for now but born n raised near NYC. Miss going to HK from China
Hi Susan! It's nice to hear about different ways this dish is prepared...thanks for sharing! I hope you like this recipe when you make it, and hopefully you will get to visit HK again soon!
Ter
The kine sold in Honolulu-so ono! Mahalo for this easy and delicious treat. Dried scallop kinda pricey so I substituted dried seasoned shiitake, still tasty.
Aloha Ter! Thank you for the message! Dried seasoned shiitake sounds like a tasty substitution for the dried scallops. Thanks for sharing your tip and I'm so glad you liked it!
Benjamin
What should the consistency of the rice flour mixture be after adding the water?
Hi Benjamin. The consistency of the rice flour mixture should be like a slurry...like a cream consistency so it is thicker than water. If you scroll up in the post to where the instruction photos are, or if you watch the video on how to make it (just above the recipe card), you'll get an idea of what it should look like. Hope that helps!
Rob
This is an excellent recipe.
Thanks
Thanks so much!
Diane T
Why do you need to reheat the reserved soaking liquid before adding to the rice flour mixture?
Hi Diane! I heat the reserved liquid so that the rice flour incorporates better and the slurry becomes slightly thicker than if I just used the liquid cold, reducing the chances of the rice flour settling or separating as quickly, making for a more consistent texture in the cake. That being said, I'm sure that not reheating the reserved liquid would probably work fine as well. I would just make sure to give the rice flour liquid mixture a good whisk before pouring it into the dish right before steaming. Thanks for the question!
Wendy
Thank you! Made this tonight and turned out great!
Thanks for trying the recipe, Wendy! I'm so glad you liked it!
Kay
It doesn't say steam high, med, or low for an hour. I have an electric stove so it makes a big difference. I think it might be low.
Hi Kay! I keep the heat at about medium to maintain a medium boil to the water. You don't want the water simmering on low or a full rolling boil at high. I hope that helps. Thanks for comment...I've added the notes about steaming to the recipe.