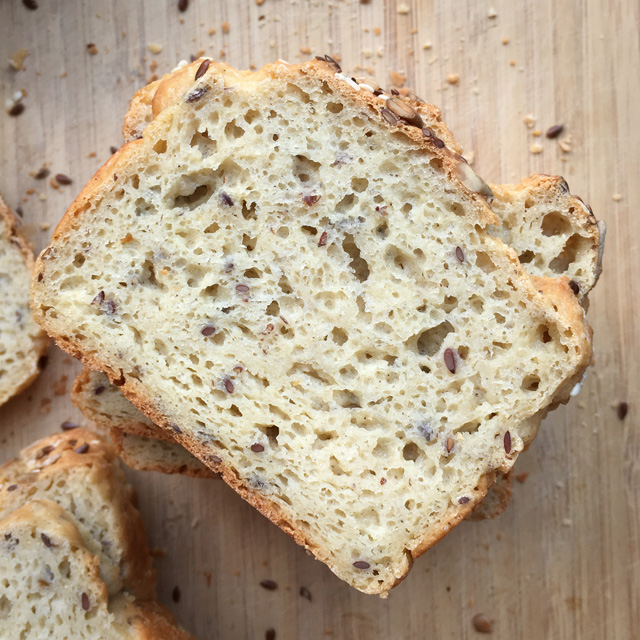
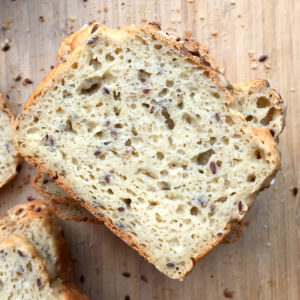
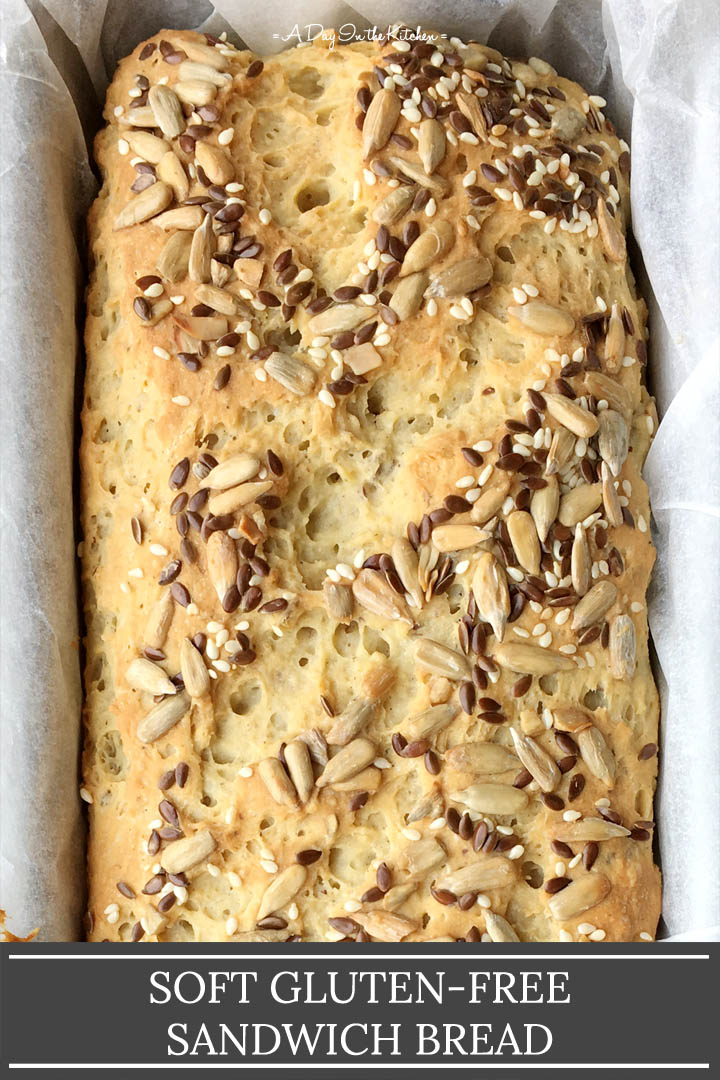
This gluten-free sandwich bread is how gluten-free bread should be! It's soft, tender, tasty, and just so good that you can't tell it doesn't contain wheat!
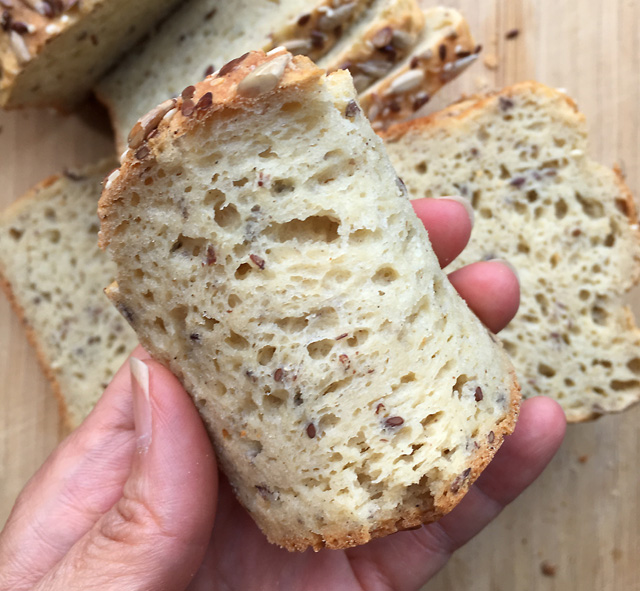
This gluten-free sandwich bread is soft and delicious.
Not words you'd ever associate with any gluten-free bread, right???
It's also a prime example of patience and perseverance because it took me a long time to get this right. A very. Long. Time.
My first attempt at making gluten-free bread was mediocre at best, and at first, I was quite excited about it.
But as I looked at it more, I realized it resembled a brick.
And oddly enough, it was heavy like a brick.
And if you ask my family, it was like eating a brick.
Okay maybe not. No one lost their teeth eating that very first attempt at gluten-free bread. 🙂
But were we excited about it? Not particularly. Did we finish the loaf? Uh...no.
And I could have given up.
But I didn't give up and my family is so glad I didn't!
It wasn't easy making that first loaf, having to figure out all the ingredients only to have it come out like something that could be used as a doorstop...or a paperweight.
What I wanted to achieve was gluten-free bread that someone on a gluten-free diet would love. I wanted to create a real, soft, squidgy bread and prove, once and for all, that gluten-free bread doesn't have to be dense, dry, and crumbly. Just about every gluten-free bread we ever bought was like cardboard...and they wouldn't brown in the toaster. What is that all about??
There are actually some gluten-free bread mixes out there that produce a decent loaf of bread. However, I didn't always want to rely on a pre-packaged mix if we wanted bread, and they aren't very affordable. Once I was able to develop this recipe, I never looked at a bread mix again!
I have made this bread several times and I never tire of watching a mix of basic ingredients transform to a beautiful loaf of bread. And then to have that bread be all soft and squidgy like "real" bread is incredibly satisfying and fulfilling.
Who'd a thought it was possible, right?
I certainly had my doubts, but I'm glad I didn't let my early failures deter me from getting to this result! And I have to say that my family was incredibly patient as I worked through each attempt, having to eat every single iteration. But it paid off and now my family likes my bread more than the gluten-free bread mix I used to buy! I call that a total success!
If you haven't tried making your own gluten-free bread yet, or if you haven't eaten any good gluten-free bread, you have to give this recipe a try! I've done all the research and work and you'll be amazed at how it's just like "real bread"! 🙂
~ Lisa.
Watch How It's Made!
Soft Gluten-Free Sandwich Bread
Ingredients
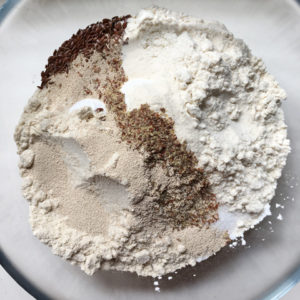
Dry:
- 225 g tapioca starch (same as tapioca flour)
- 100 g brown rice flour
- 75 g sorghum flour
- 1 tbs xanthan gum
- 1 tbs ground flax seed (can be omitted)
- 1 teaspoon whole flax seed
- 1 ½ teaspoon salt
- 1 tbs active dry yeast (instant yeast okay; see Recipe Notes below)
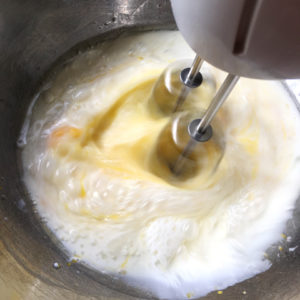
Wet:
- 1 ¼ cup milk warmed to 110 deg F (43C)
- 3 eggs room temperature
- ¼ cup light olive oil
- 2 tbs honey
Toppings (optional):
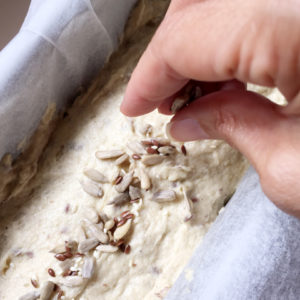
- 1 teaspoon whole flax seed
- 1 tbs sunflower seeds
- ½ teaspoon sesame seeds
Instructions
- Combine all dry ingredients in a bowl and stir together with a whisk; set aside.

- Combine milk, eggs, olive oil, and honey in mixing bowl; mix well.
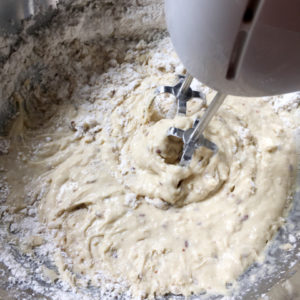
- Add dry ingredients to the milk and egg mixture and mix for 1-2 minutes. A paddle attachment, dough hooks, or hand mixer beaters will all work with this dough.
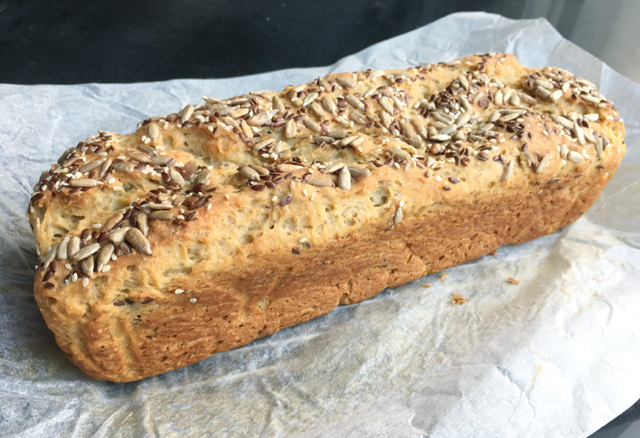
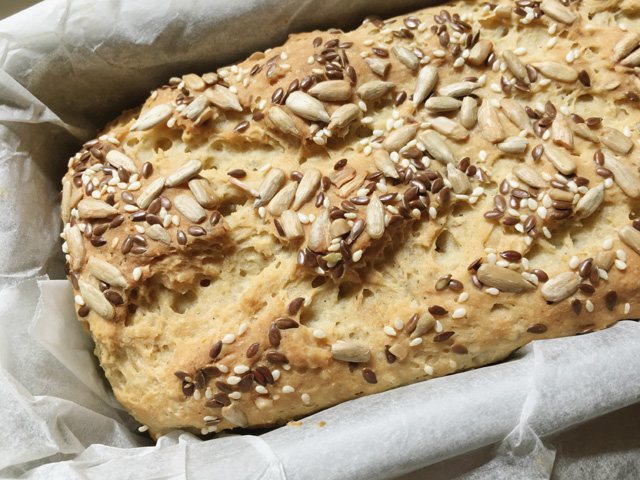
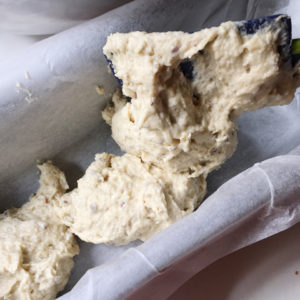
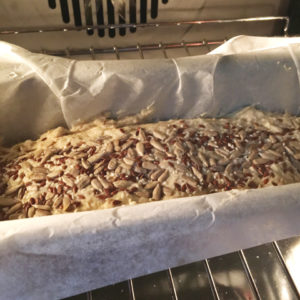
- Pour or scoop into a parchment-lined loaf pan. Make level with a spatula.
- Scatter whole flax seeds, sunflower seeds, and sesame seeds on the top of the dough.
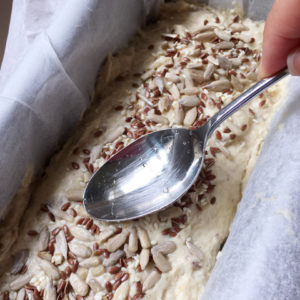
- Gently press seeds into the dough with wet fingers or the back of a wet spoon.
- Let the dough rise in the loaf pan in a warm draft-free location for about 1 hour (check at 45 minutes). Bread dough should be no higher than ½" above the edge of the pan. (see note below)
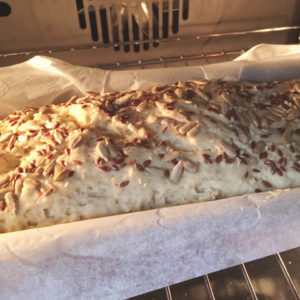
- Preheat oven to 350 deg F (180 C). The bread dough will be slightly "jiggly".
- Bake for 55 minutes. If you do not want the crust to overbrown, drape a piece of foil over the bread AFTER the first 35 minutes of baking (completely optional...see Recipe Notes below).
- Bread is done when the internal temperature taken with a thermometer is over 200 deg F (93 C). A temperature reading close to 210 deg F is even better (98 C).
- Remove from oven and let bread rest for 3-5 minutes.
- Using parchment, lift bread out from the pan and set on a rack to cool completely.
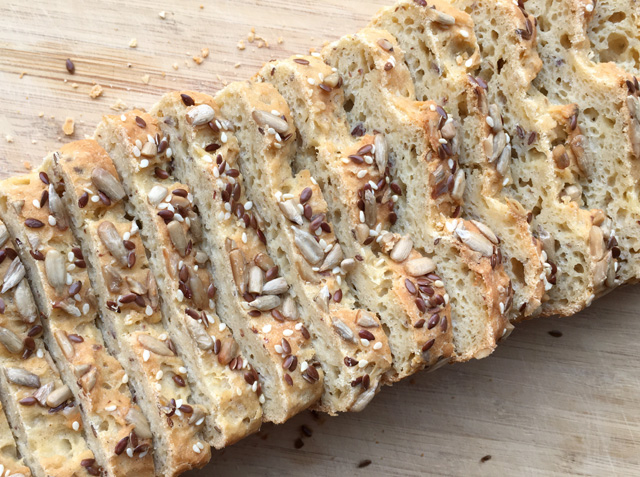
- Let cool completely before slicing.

Notes
- Volume Measurements:
- 2 ¼ cups tapioca starch
- ¾ cup + 2 tbs brown rice flour
- ¾ cup sorghum flour
- Please note that gluten-free recipes work best with weight measurements because they are more precise than volume measurements. Gluten-free baking requires more precision and can be less forgiving than baking with regular all-purpose wheat flour.
- These volume measurements were made from spooning each of the flours into the measuring cups/spoons (so they are not packed) and leveling them off.
- The volume measurements are approximate. Make slight adjustments to the recipe as needed, adding a bit of water or a bit more tapioca starch or brown rice flour to achieve the correct dough consistency.
- Liquid Measurements in Grams:
- 1 ¼ cup milk = 305 grams
- ¼ cup oil = 55 grams
- Volume Measurements in Milliliters:
- 1 teaspoon = 5 ml
- 1 tablespoon = 15 ml
- 1 cup = 250 ml
- The ground flax seed can be omitted if you have an allergy to it.
- You can substitute the milk in the recipe with water or nut milks without any problem.
- I add the active dry yeast directly to the dry ingredients without proofing.
- If you want to proof the yeast first, you can test it in ¼ cup of the warm milk/water with the honey before adding it to the dry ingredients with the remaining 1 cup of warm milk/water.
- You can use the same amount of instant yeast in place of the active dry yeast, but the bread may take less time to rise. Check how much the bread has risen after 30 minutes.
- In case I wasn't too clear in my description, the dough for this bread will not be like your typical wheat-based bread dough which you can actually handle. The dough will be more like a thick batter that you have to scoop into the pan. Do not worry if you see this as it is normal for some gluten-free bread recipes to be like this! Just scoop or pour the dough into the pan, even it out, let it rise, and then bake!
- Topping the bread with seeds is completely optional and can be skipped.
- Let the bread rise in a draft-free area on the counter. I also have let my bread rise in the oven with only the oven light on, carefully removing the bread to preheat the oven before baking.
- Covering the bread with foil while baking is an optional step if you do not want the bread to overbrown (it is still good if you skip the foil).
- If you cover the bread with foil, bake it UNCOVERED for the first 35 minutes and then cover for the remaining baking time. This will help reduce any chances of bread "shrinkage" while baking.
- Let the bread cool completely before slicing to avoid any gumminess.
- Store any leftover bread in a sealed bag or container for 2 days on the counter. If keeping for longer, keep bread slices in the fridge or freezer and then reheat in the toaster.
Nutrition
This post was originally published on May 21st, 2017, republished in November 2018 with new photos, instructional photos, slight recipe modifications, and updated recipe notes. Instructions regarding covering the bread with foil while baking and Recipe Notes were updated April 9th, 2021.


Emily
This is the BEST bread recipe!
I do seem to be having a problem with my loaf collapsing a fair amount after I take it out of the oven. The loaf is 2-3 inches above the edge of the pan when I pull it out of the oven, and then it always collapses 1-2 inches. Do you have any tips/tricks to avoid this??
Thanks!
Thanks for your comment, Emily! I'm so glad you like it! One thing I would make sure of is that the internal temperature is at least 210 deg F. Another suggestion would be to reduce the yeast to maybe 2 tsp. It will result in a slower rise, but that might help. I also think a narrower loaf pan works better than wide ones. Let me know if any of these tips help!
Julie D'Ambrosio
I’m looking to make this bread do I need to make changes if I use a bread maker ?
Thanks so much
I have not tried this recipe in a bread maker, but if possible, I would suggest eliminating the second rise/proof. Gluten-free bread only needs one rise/proof before baking, with no "punching down" of the dough. Please let me know how it turns out!
Kathleen
Hi!! This recipe so far as been the best GF bread recipe to date. However the only issue I had was that after taking it out of the oven - it spilt down the middle and collapsed. I was wondering what I did wrong for this to happen, as it was nice and high when it came out.
Thanks!!
Thanks for your comment, Kathleen! I'm really glad you liked the bread! Are you saying it collapsed after it was done baking? One suggestion is to make sure all the ingredients were measured properly. Too much yeast could create too fast a rise and not enough structure to build, so that could cause the collapse. Also, removing it from the oven if the internal temperature is too low will cause it to collapse. Other than that, I'm not sure what else to suggest. I do hope you'll give it another try, and if you do, please let me know how it turns out.
Erika
Can I use almond milk? 🙂
I have a friend who also used water in place of the milk, so I can't see why almond milk wouldn't work! Give it a try and let me know how it works out!
Erika
I made this recipe today and it was fantastic, better than traditional bread!! Thank You so much for sharing!!!!!! 🙂
That's fabulous news, Erika! I'm so glad you liked it!
Jo
After being on SCD and GAPS diets for 10 years we have started adding in GF flours. I use to bake sourdough wheat bread at least once a week prior to being ill. I have missed having a piece of bread to hold in my hands and actually making a sandwich. This will now be the go to recipe!! Loved it! Mine fell in the middle but it raised too much (it was in a Happy spot by the wood stove!.…...so it was "my bad"!!) Thanks for hanging in there to create this recipe!
Thanks, Jo! I'm so glad the recipe worked out for you and that you can enjoy sandwiches again!
Brenda W
Easy, nothing too fancy to get a great tasting bread. Bet you won’t know there is no gluten.
Thank you so much for this recipe.
Thank you so much, Brenda!
Roger
Hi ! Your recipe looks delicious, but I don’t like surghun flour I have made some gluten free bread and my family also did not appreciate the flour ! What can I replace please. Thanks for the recipe!
You can try replacing the sorghum flour with the same amount of brown rice flour or buckwheat flour. Those would be my first go-to substitutions as they are most similar to sorghum. Let me know how it goes if you try it. Thanks!
Cathy
As someone who appreciates how difficult it is to get gluten free bread right, I applaud what you've accomplished here! I love the addition of seeds, too!
Thank you so much, Cathy! I appreciate the comment!
Denise from Urbnspice
This looks like a very good gluten-free bread, Lisa! Great on you! I will pin to try!
Thanks, Denise! I hope you like it!
Colleen
This bread looks delicious, Lisa. Even though my family and my blog, are not gluten free, I like having a few recipes that work, for when we have those peeps around. This one looks like a winner. (I really love all the seeds on top, especially!)
Thanks, Colleen! We love this bread. Hopefully, if you get a chance to make it for GF peeps, they will, too!
David S.
I have tried quite a few gluten-free bread recipes and I must say they were not good. Yours is the best! I really can't believe it as I have failed so many times. I did make a few minor changes. The first was I didn't use instant yeast and instead used active yeast. This means I had to proof the yeast in some of the milk prior to adding it to the flour mix. The second is I changed sorghum flour to oat flour (just put oats in blender and blend until a powder). Lastly, as I don't like to have arsenic in my rice flour, I prepare my own rice flour. I do this by first rinsing rice in water, then transfer washed rice to a bowl of water and leave several hours or overnight. Next I rinse again and then put in a 9 x 12 inch pan, transfer to 200 degree F oven to remove water over a few hours. Finally, I blend in a blender until a powder. This removes much of the arsenic in rice. If you are eating a great deal of rice, this is a good thing to do. Otherwise, I followed your directions as listed. Great bread!!!
Thanks for the comments, David! I'm so glad it worked out for you and that you liked it! I appreciate you sharing how your adapted the recipe, too!
Eryn
I’m so confused. I was very careful to weigh and measure the ingredients and it turned out like a liquidity pancake type batter. Is this right?
Hi Eryn! The bread dough will not be like a traditional wheat-based dough that you can hold in your hands. It should not be too thin, but it will be pourable, almost like brownie batter.
Kaman
Hi Lisa, I made the bread using your recipe and it was a success! I love the texture and the taste and it rose up more than other recipes I've tried. I did forget the flaxseed and had to substitute water for the milk as my stomach will not let me tolerate it but it didn't make a difference to the end result. This recipe is a keeper and I will definitely be making it again! Thank you.
Thanks, Kaman! That's great to know that the recipe worked with water instead of milk. I'm so glad you like the recipe! Yay!