This buckwheat bread is not only soft and delicious, it's also incredibly easy to make! It is perfect for sandwiches, and slices also toast up beautifully for topping with butter and jam...or avocado! You can be gluten-free and still get to enjoy delicious homemade bread!
If you are gluten-free and have been subjecting yourself to dry tasteless gluten-free breads because you miss bread so much...don't torture yourself any more!
I can understand how it might feel like there are no good gluten-free bread options and how it may just seem hopeless.
But I've got a recipe to restore your faith!
This buckwheat bread is soft and delicious, and even better is that it's very easy to make!
How To Make Buckwheat Bread
Ingredients
I like to break down my recipes into the dry ingredients and wet ingredients that then get brought together to make bread magic!
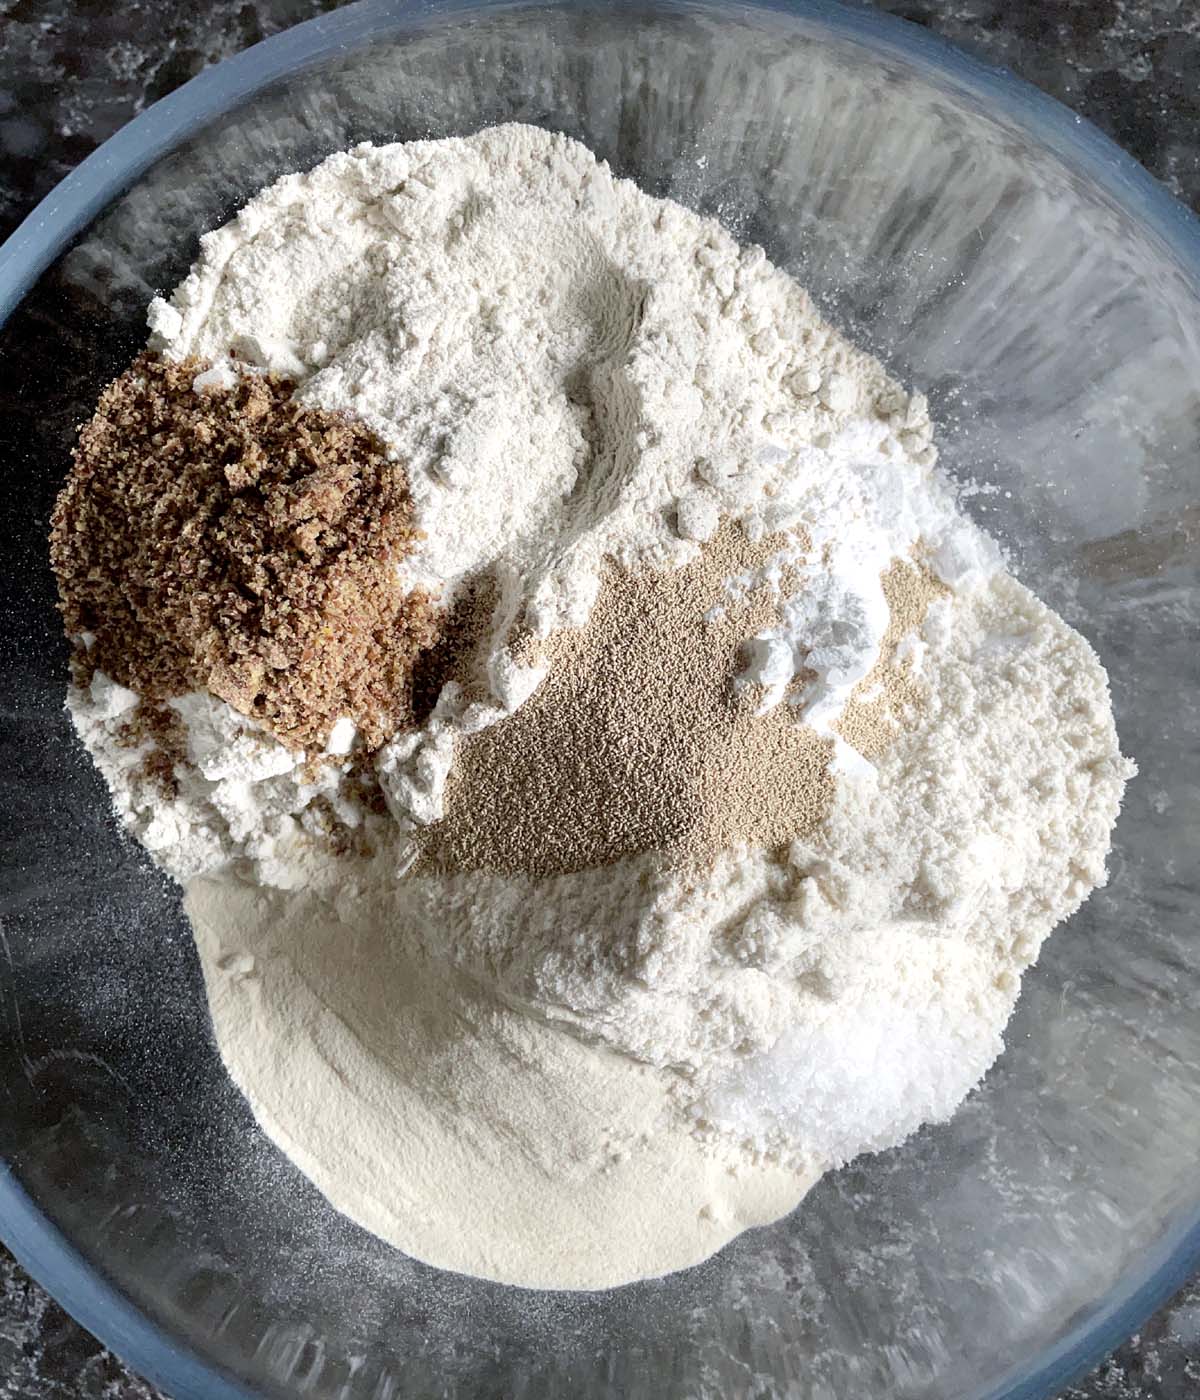
Dry Ingredients: You'll need buckwheat flour, brown rice flour, tapicoa starch, xanthan gum, ground flaxseed, active yeast, and salt. (Check the Recipe Notes below regarding buckwheat flour color.)
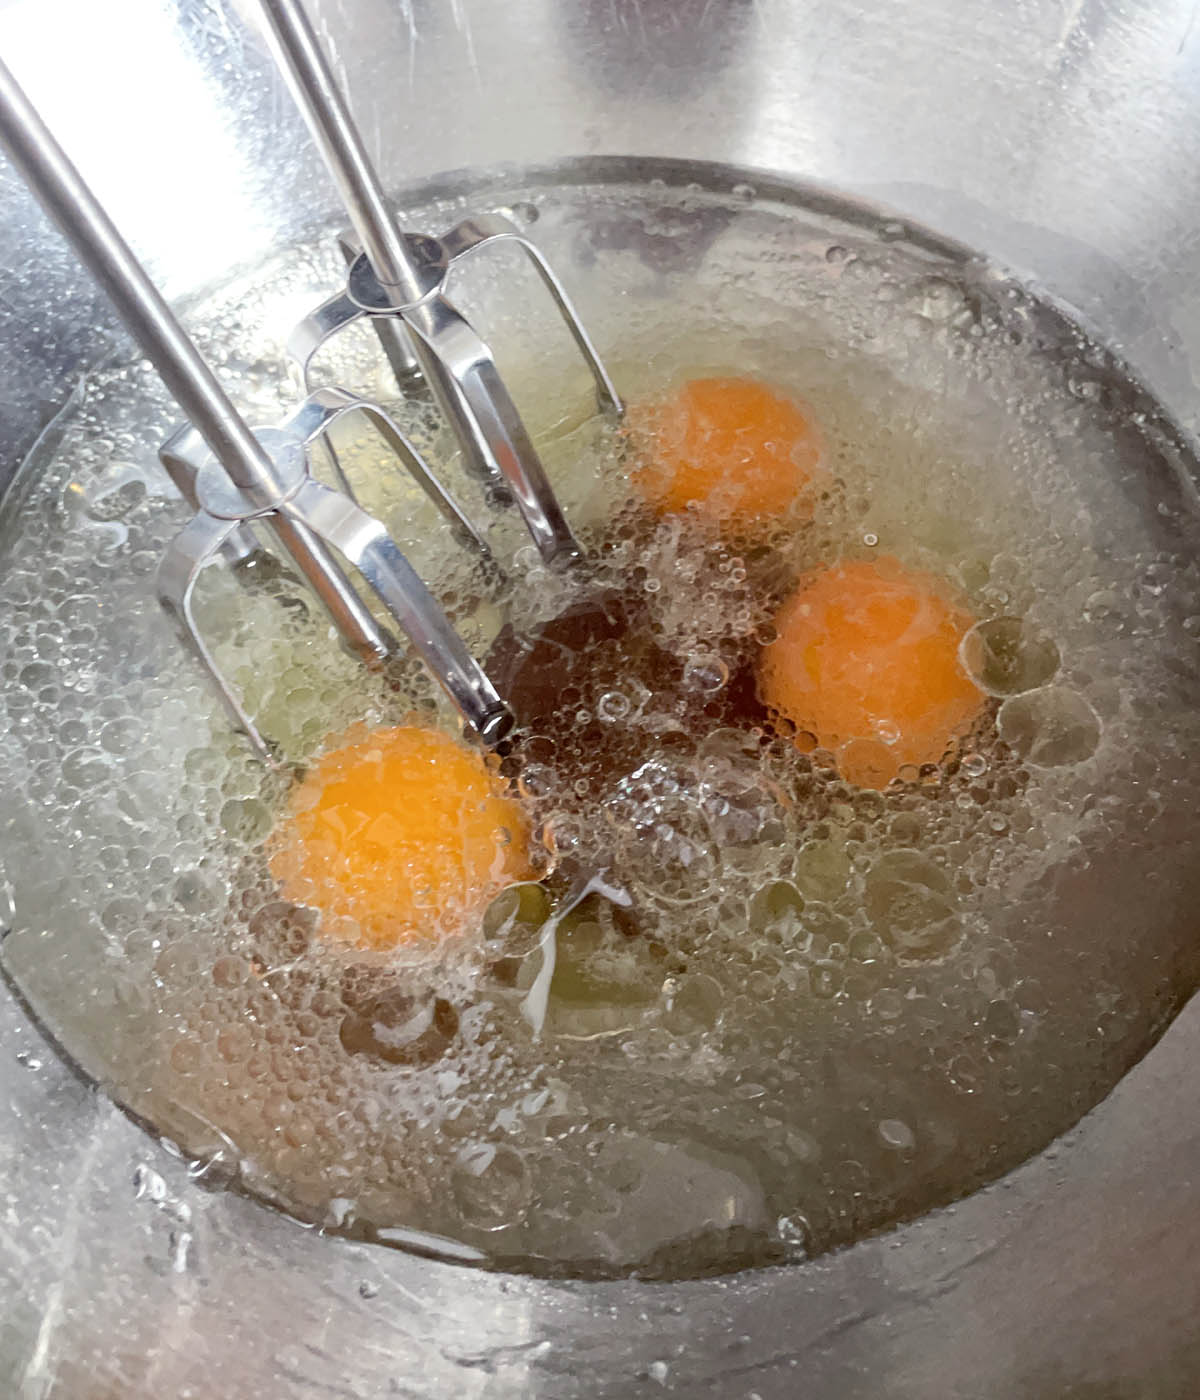
Wet Ingredients: You'll need water, oil, eggs, and honey.
You can't get much simpler than that, right?
And putting all those ingredients together to make the bread is just as simple.
*There is no kneading required and it only needs ONE proof. Repeat that a few times to yourself, let it sink in for a moment...and let's get baking!
How To make Buckwheat Bread
Combine all your dry ingredients in a bowl and whisk together. Set aside.
In a mixing bowl, combine your wet ingredients and beat with a mixer or whisk until well-combined.
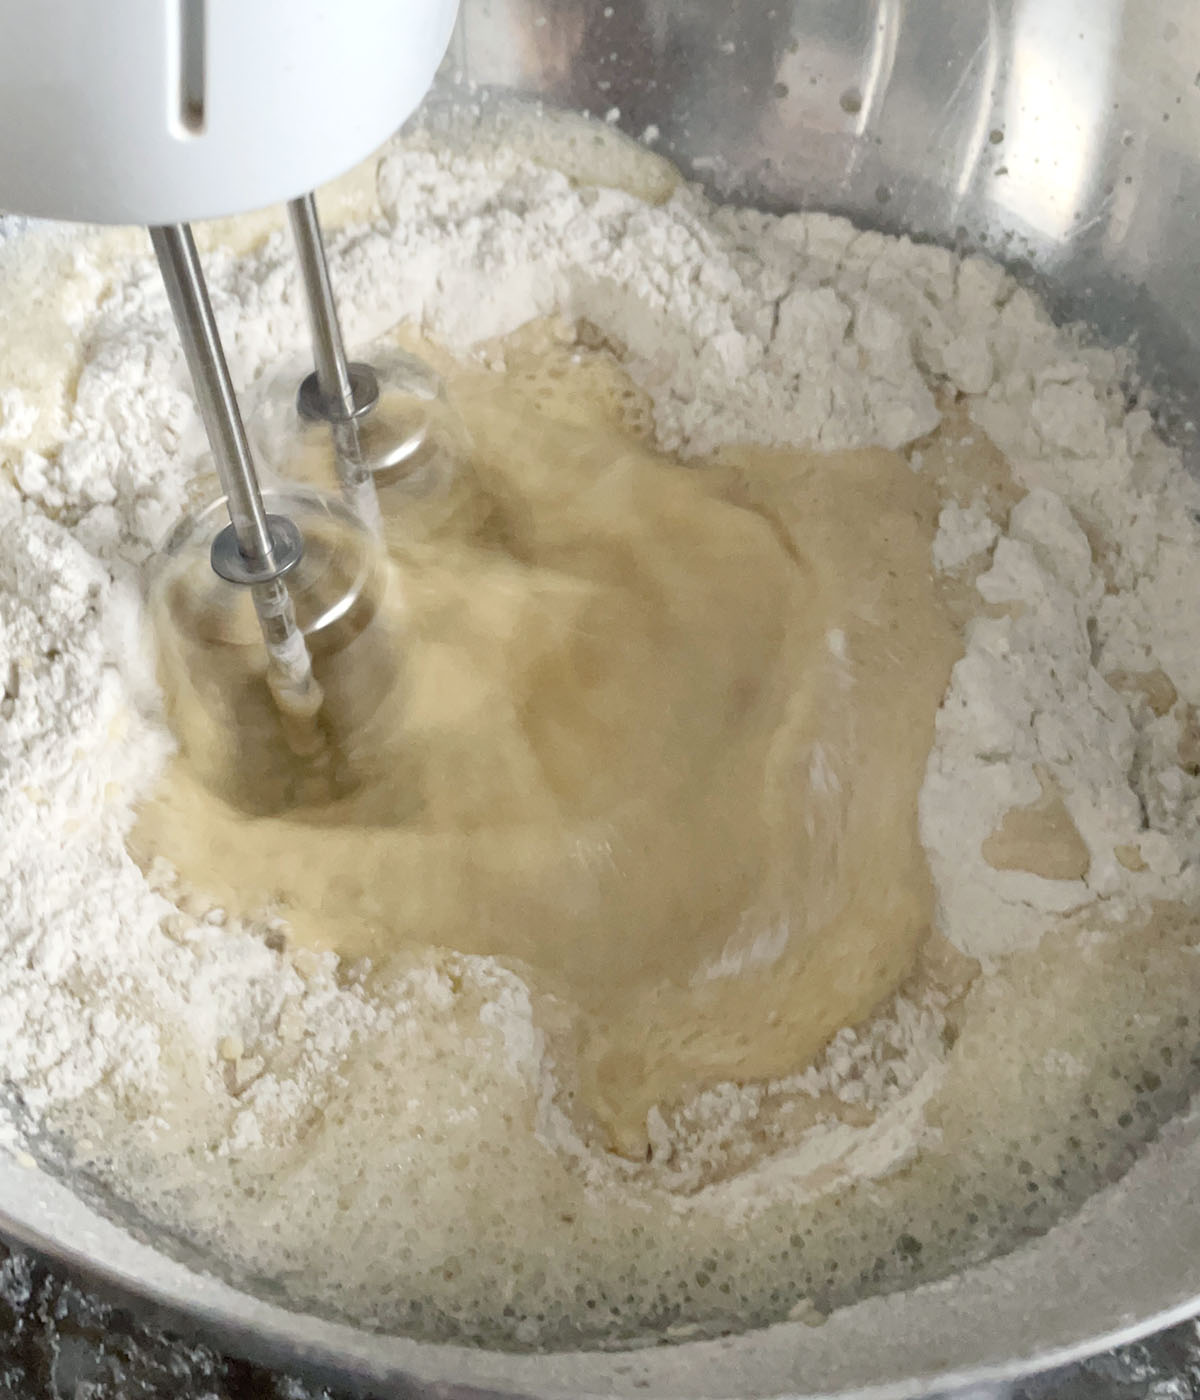
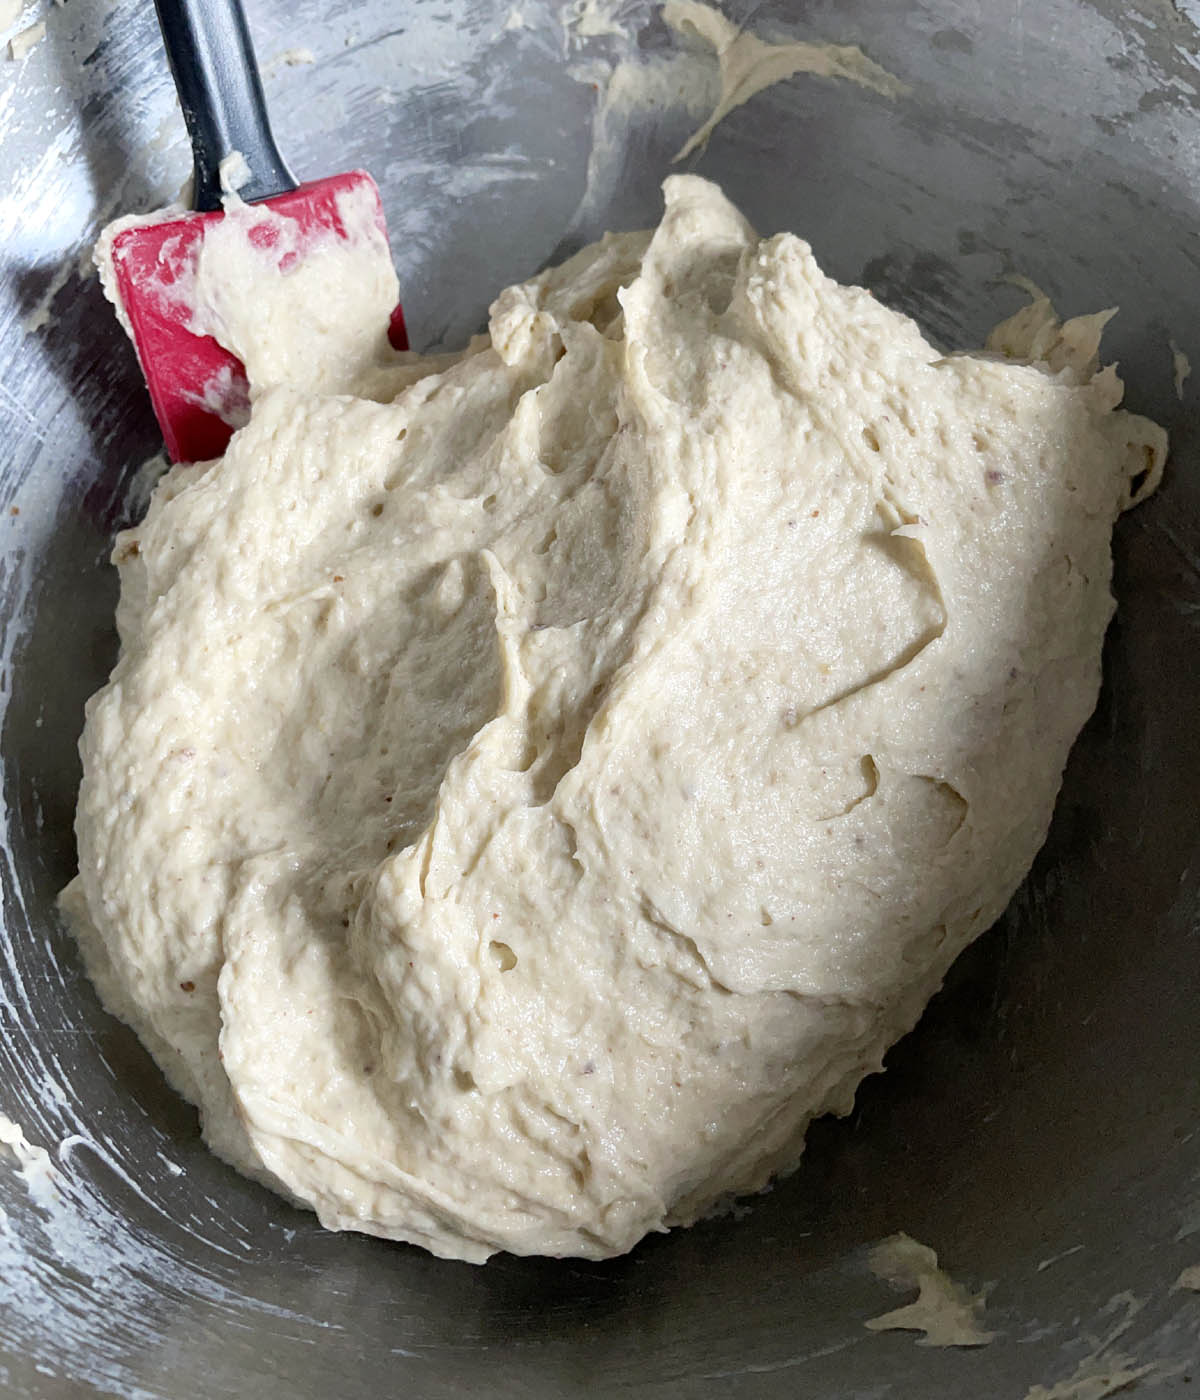
Add the dry ingredients to the wet and beat well for 1-2 minutes, scraping down the sides of the bowl halfway through.
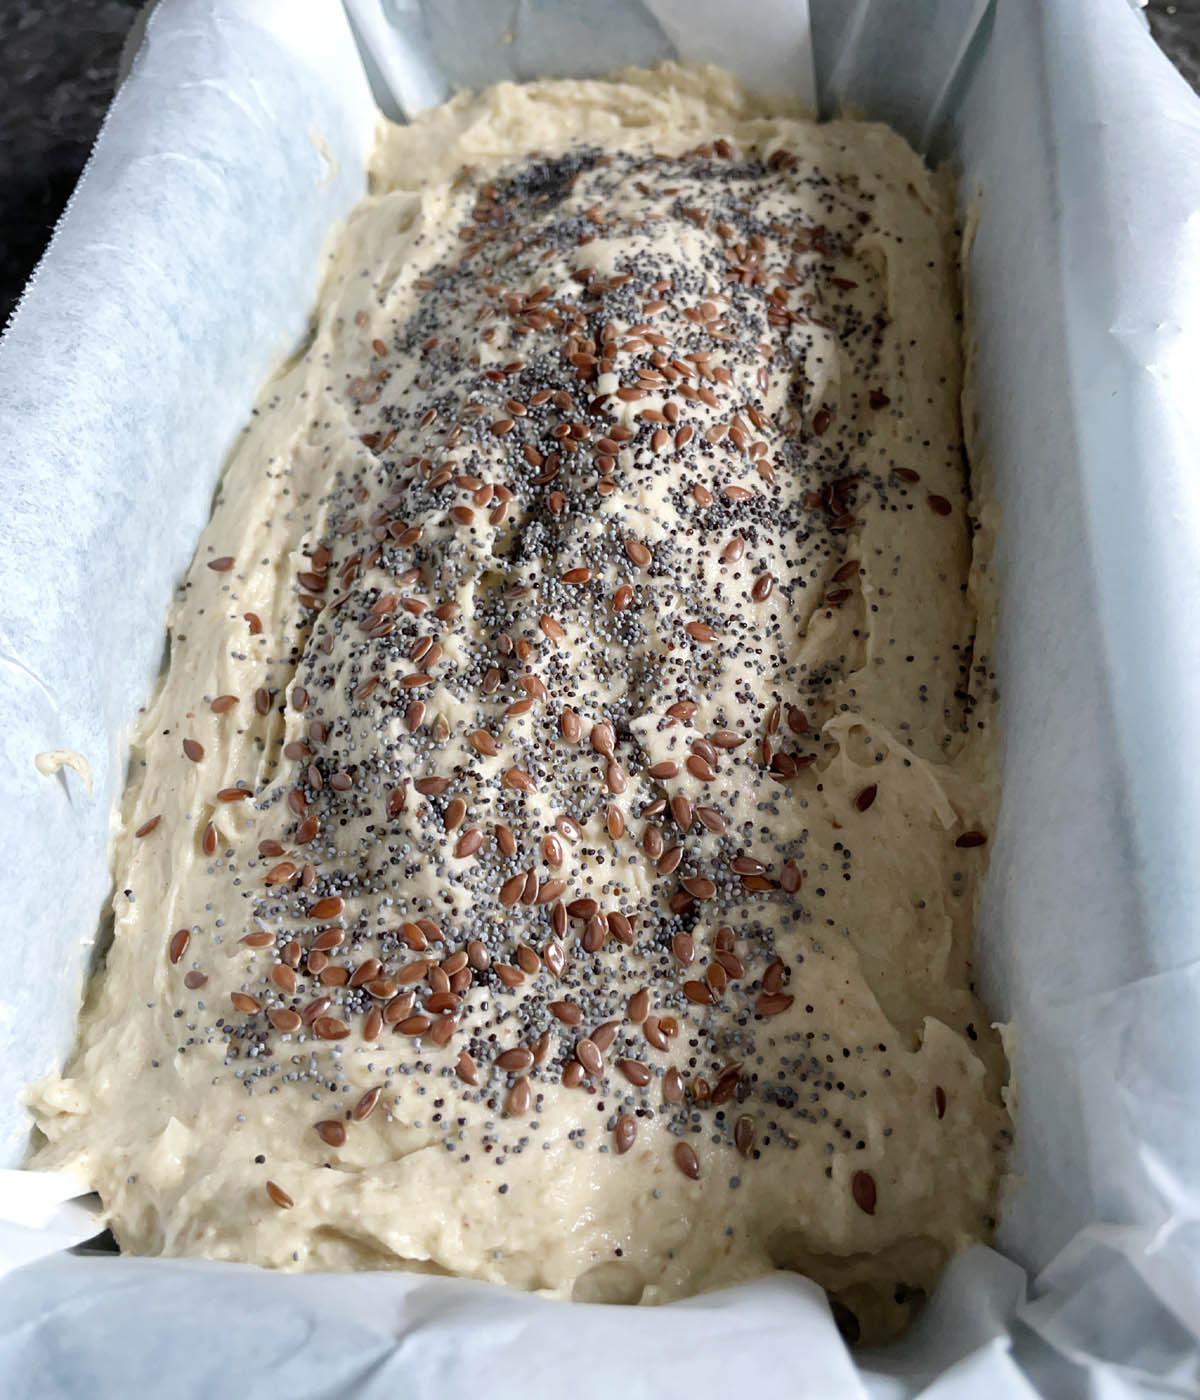
Scoop the bread batter into a parchment-lined loaf pan, spreading the batter to fill the corners. I like to shape the batter so it's domed in the middle, but it's not necessary.


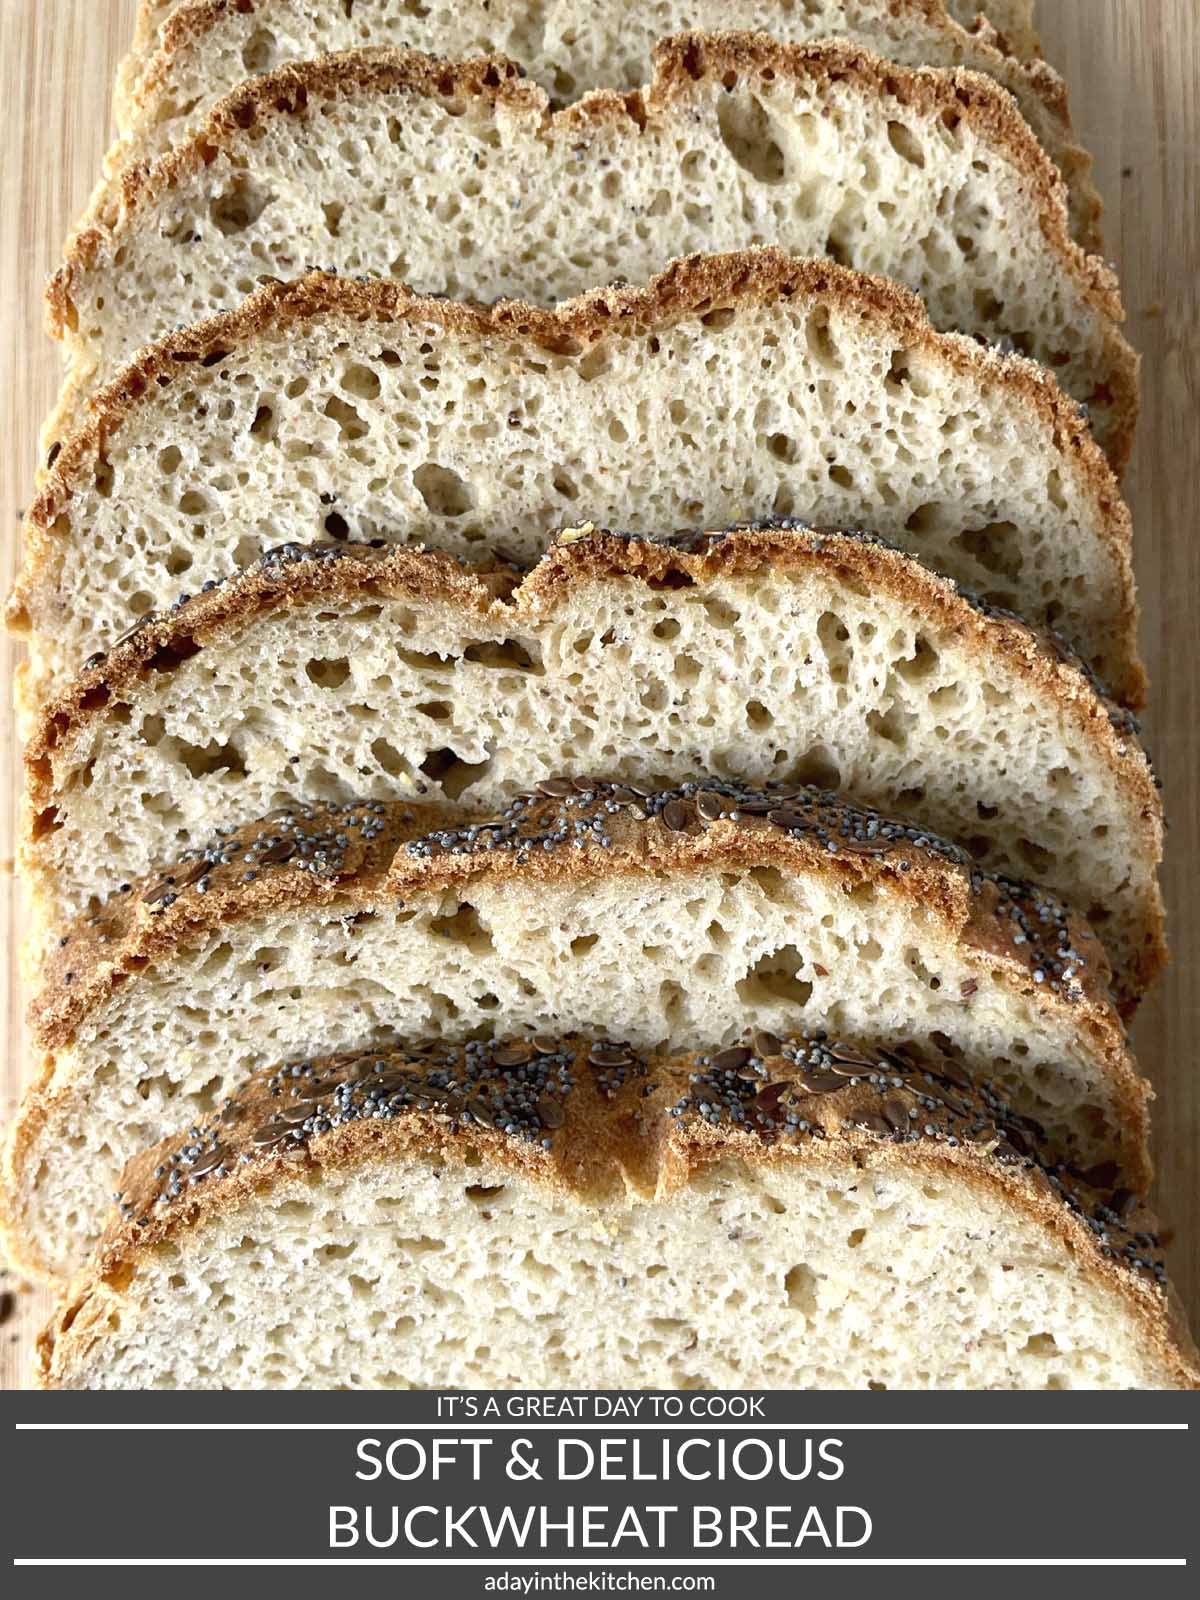
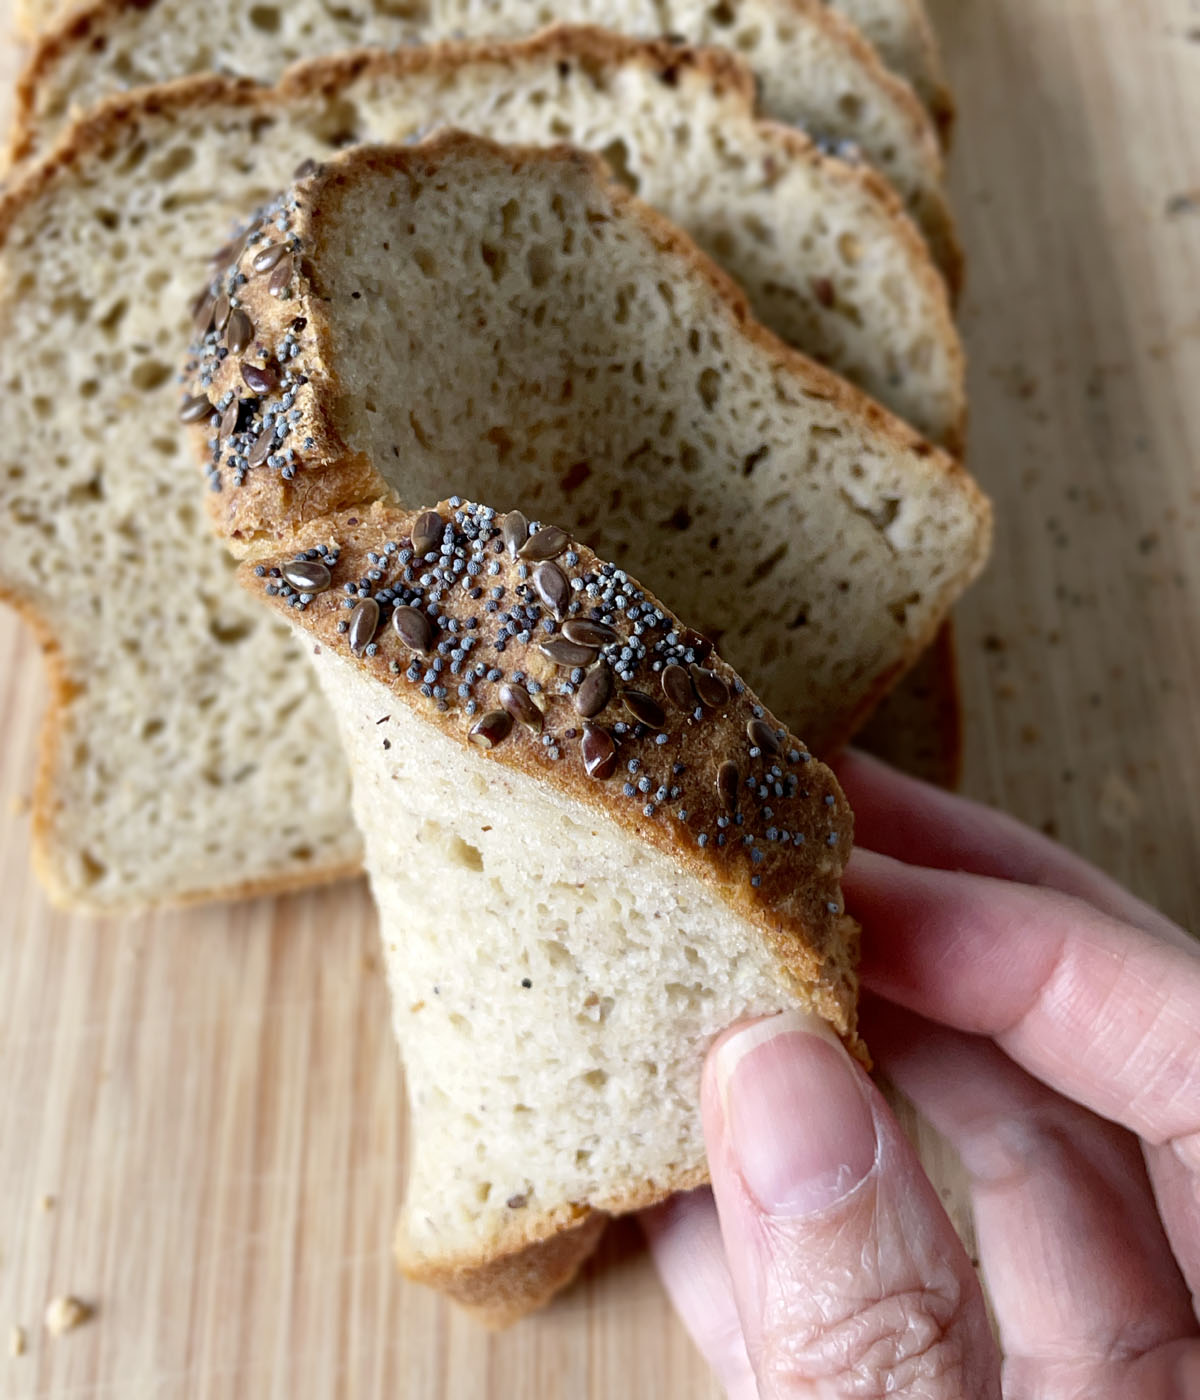
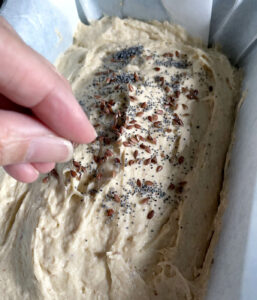
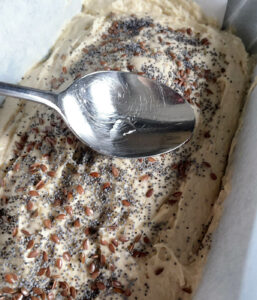
As an optional step, you can sprinkle whole flax seeds and poppy seeds on top of the batter, just to give the bread a bit of a decorative top. Use dampened fingers or a spoon to gently press the seeds into the bread batter.
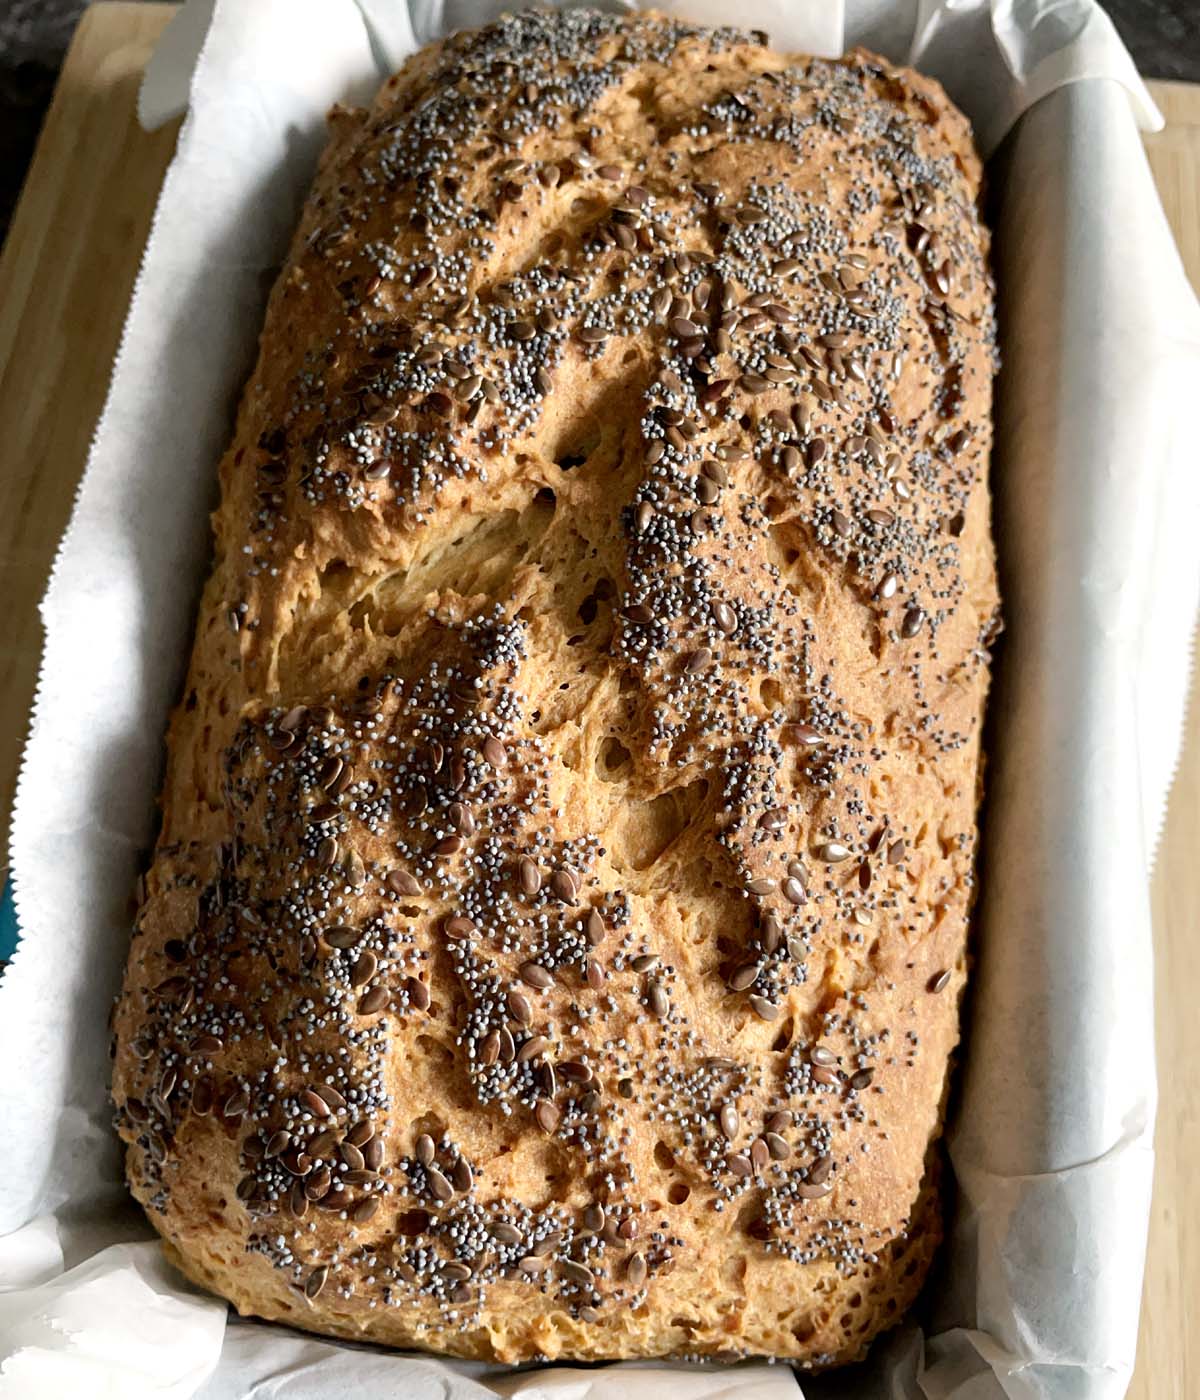
Set the loaf pan aside and allow the bread to proof/rise until it is just above the edge of the pan.

As I mentioned above, making this bread or any of my gluten-free bread recipes is so easy because it only has to go through one proof/rise. Traditional wheat bread usually involves allowing the dough to rise, punching it down, shaping it, and allowing it to rise again before baking. But not gluten-free bread! No kneading needed and only one proof before baking! If that isn't easy, I don't know what is!
Bake the bread for 50-60 minutes, until the bread is browned and an instant-read thermometer inserted into the middle registers least 200F/93C. Remove from the oven and allow to cool in the pan 5-10 minutes before using the parchment paper to transfer the bread to a cooling rack.
Enjoy "Real" Bread Again!
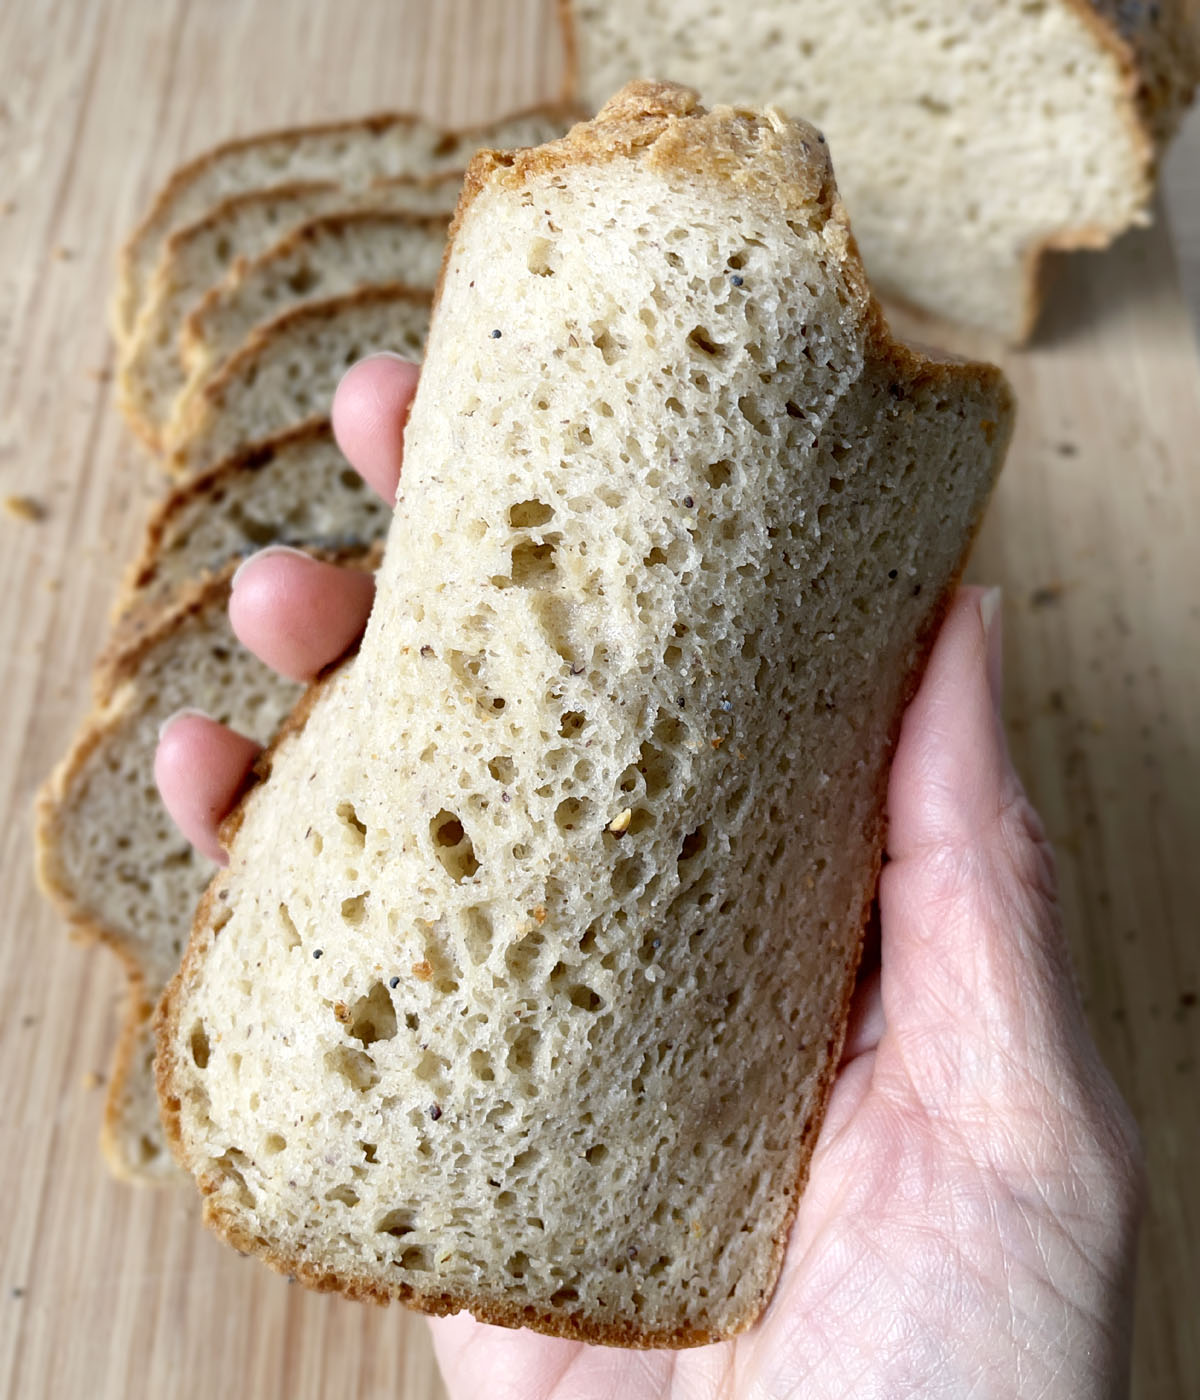
As tempting as it might be, it's important to let the buckwheat bread cool completely before slicing. If you slice it too soon, it will be too gummy inside and you won't get nice slices of bread!
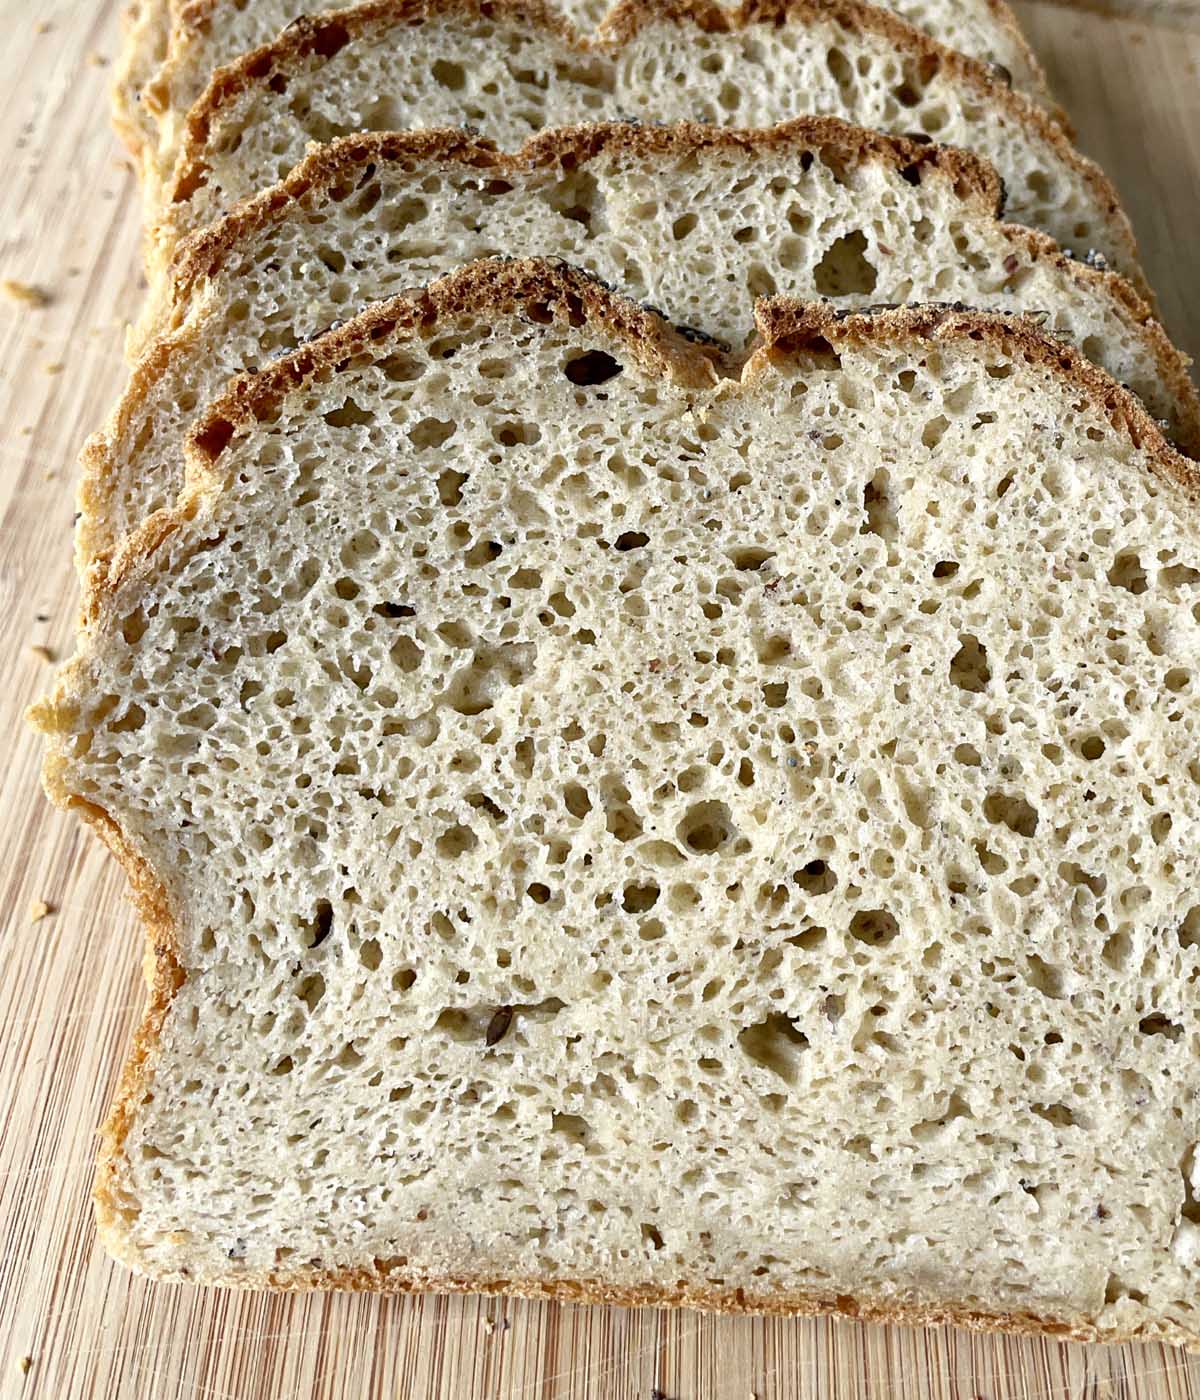
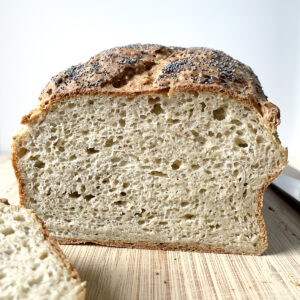
Once you do make those first slices into the loaf, you are going to love what you see! The bread is SOFT, and the crumb has varying air bubbles, just like REAL bread.
Check out how this bread bends! These photos prove how soft it is! No more stiff dry bread slices that look (and taste) like cardboard!
Sandwiches made with this fresh buckwheat bread are soooo good. Stuff your favorite fillings between two slices and you are going to be in sandwich heaven!

Toasting the Bread
So something I found with gluten-free breads I had purchase in the past was they never seemed to brown in the toaster. It was really weird and, again, not seeing browned toast, no matter how long I toasted the slices, just didn't seem right.
Well, check this out!
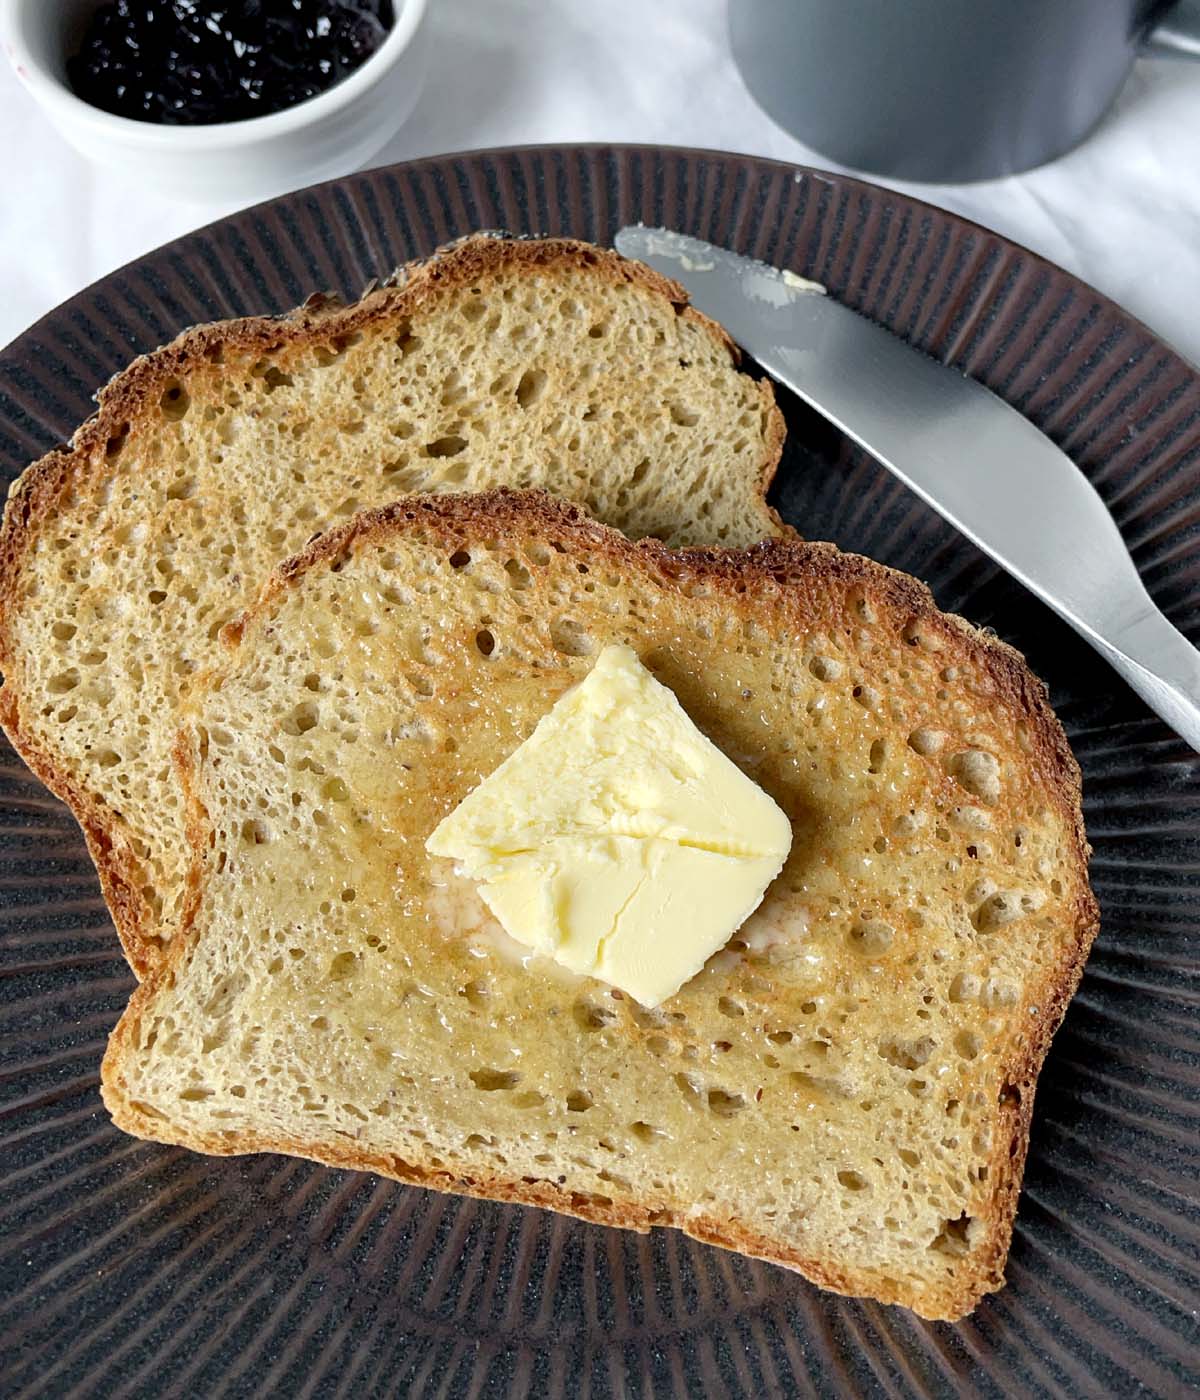
Slices of the buckwheat bread toast up beautifully! Slather on some butter and jam, or top it with some avocado!
Commonly Asked Questions
The bread will taste best the same day you make it. Store any leftover bread in a resealable bag on the counter for a day or in the refrigerator.
Yes! If you want to freeze the bread, I would slice the entire loaf first and then store in a resealable freezer bag, squeezing out the excess air.
When you want to eat a slice or two, regardless of whether the bread has been on the counter overnight, in the fridge, or in the freezer, pop it into the toaster, or wrap the slice in a slightly damp paper towel and microwave it for 10-20 seconds to warm it through if you want to eat it soft.
Looking for More Gluten-Free Bread Recipes?
This buckwheat bread recipe is one of my most popular! I have spent a lot of time developing and refining gluten-free bread recipes so that the end result don't make you hate being gluten-free. Check out these other bread that are all slightly different but totally soft and delicious!
Soft Gluten-Free Sandwich Bread
Soft Homemade Gluten-Free Bread (dairy-free)
Gluten-Free Honey Oat Nut Bread
Now you can be gluten-free and have your bread, too! Happy baking!
~ Lisa.
Watch How To Make It!
Soft and Delicious Buckwheat Bread
Ingredients
Dry Ingredients (volume measurements in Recipe Notes below):
- 175 grams tapioca starch (same as tapioca flour)
- 120 grams buckwheat flour
- 105 grams brown rice flour (white is fine)
- 1 tablespoon xanthan gum
- 1 tablespoon ground flaxseed
- 2 ¼ teaspoons active yeast (one packet)
- ½ teaspoon salt
Wet:
- 1 ¼ cups warm water (about 110 deg F)
- ¼ cup light olive oil
- 3 eggs, room temperature
- 2 tablespoons honey
Topping (optional):
- ½ teaspoon whole flax seeds
- ½ teaspoon poppy seeds
Instructions
- Combine all dry ingredients in a bowl and mix well with a whisk. Set aside.

- Combine all wet ingredients in a large mixing bowl and beat with a mixer until combined.
- Add the dry ingredients to the wet and beat with mixer until well combined.
- Scoop bread batter into a parchment lined bread loaf pan and smooth out with a spatula.
- Sprinkle whole flax seeds and poppyseeds on the top of the bread batter, keeping the topping away from the edges.
- Using a dampened spoon, gently press seeds into the bread batter so they stick.
- Place loaf pan in a warm, draft-free area to rise until dough is no more than ½" above the edge of the pan, about 1 hour.
- Preheat oven 350 deg F (180 C).
- Bake for 50-60 minutes, until an instant-read thermometer inserted into the middle of the loaf reads at least 200F, ideally 210F.
- Let bread rest in the pan about 5-10 minutes before lifting out from the pan.
- Let cool completely before slicing.


Notes
- Volume Measurements:
- 1 ¾ cup + ¾ teaspoon tapioca starch
- 1 cup + 1 ½ tbs buckwheat flour
- ¾ cup + 2 tbs brown rice flour
- Please note that gluten-free recipes work best with weight measurements because they are more precise than volume measurements. Gluten-free baking requires more precision and can be less forgiving than baking with regular all-purpose wheat flour.
- These volume measurements were made from spooning each of the flours into the measuring cups/spoons (so they are not packed) and leveling them off.
- The volume measurements are approximate. Make slight adjustments to the recipe as needed, adding a bit more water or a bit more tapioca starch or brown rice flour to achieve the correct dough consistency.
- Variations in buckwheat flour color: buckwheat flour can be either light in color or have a slightly darkened grayish hue. The light flour is made from hulled buckwheat, the grayish flour is unhulled and has dark flecks from the hull. Using either type for this recipe works.
- You cannot overwork gluten-free bread batter, so do not worry about over-mixing. You should mix the dry with the wet for about a minute to make sure it's well combined.
- The bread will stay fresh in a bag on the counter for a day, or in the fridge for a few days.
- To freeze, slice the bread and store the slices in a resealable freezer bag, squeezing out most of the air.
- To soften the bread, microwave for 10 seconds, either wrapped with a damp paper towel or not.
- Slices brown in the toaster nicely.
This recipe was originally published January 20th, 2019 and republished August 14th, 2022 with new photos and writing.


Danie
Hi Lisa
I want to try this recipe soon. I have 2 questions.
-For the yeast, we just add it to the dry ingredients? No need to “proof it “ first?
- is there anything I can use to replace the rice flour ? I find rice flour has an after taste? Maybe with the buckwheat flour, it doesn’t come through
Thank you
Danie
Hi Danie! The only purpose of proofing the yeast before adding it to the other ingredients is to make sure that it is active. If you are confident that the yeast is active, follow the recipe as it states. If you are unsure, proof the yeast in a separate bowl with 1/4 cup of the warm water required for the recipe with a bit of honey to see if it blooms. For the rice flour, I would try oat flour as a first option, but try it with the rice flour first and see what you think of the flavor. Thanks for the questions and I hope I've helped!
Di
My mixture seemed a bit wet . It rose before being put in oven but didn’t rise in the oven ?
Hi, Di! The bread will rise some in the oven, but not a lot like regular wheat bread. As for your mixture seeming wet, the recipe does state that it will be like a thick batter, not a dough that you can knead or handle. So it is difficult for me to know exactly what you mean without having been there to see it when you made it, but if you refer to the photos in the blog as well as the video, you'll see what the mixture should look like. I hope that helps!
Sheila
Did I miss how long to bake it?
Hi Sheila. I apologize. The baking time is actually in the written section, but in refreshing this post, somehow the baking time instruction got deleted from the recipe card. I have fixed that now and it is back. Thank you so much for your message and for pointing it out! I appreciate it!
Pam
Hi
Thanks for the recipe. I will try it out. Can I substitute the 3 eggs for 3 tablespoons of ground flax and water? Also, I’ve seen a lot of posts where tapioca powder can be replaced with arrowroot powder. Do you agree or disagree?
Thanks for the questions, Pam. While I have heard that flax eggs can be a substituted for regular eggs, I've never tried it myself, so I'm not sure how the bread will turn out. I have also read about arrowroot being a good substitute for tapioca starch, and while I haven't tried it myself, I would probably go ahead and make that substitution without much hesitation. Tapioca starch can also be substituted with cornstarch or potato starch. I hope that helps!
Candace
I fell across your pizza recipe then this buckwheat bread recipe and first thing noticed no potato flour/starch anywhere! I have not tried them yet but so happy about no nightshade in the recipe(I just can't tolerate). I can't wait! I just know I am going to love them!
Hello Candace! Yes, you are correct! I purposely stay away from using potato flour and starch in my gluten-free baked goods, and that's why I choose not to use pre-packaged gluten-free flour blends and make my own blends from scratch and customized to each recipe. I'm so glad you found me and I hope you like the recipes!
Hojicha
So happy I tried your recipe. Got to admit i was a bit sceptical at first because I thought gluten free bread is typically dry and dense. Needless to say I was pleasantly surprised and thrilled when the bread came out from oven. Will definitely make this bread again and again. Thank you for sharing this great recipe with us!
Hi Hojicha! I'm glad that you still tried the recipe even though you were skeptical! Thanks so much for making the bread and I'm so happy that you liked it!
Annelies
Love the recipe and the bread. My partner is on a gluten free diet and is a difficult eater due to allergies for nuts and certain seeds. This bread is a winner and trust me I have tried many. The only thing is that sometimes the bread collapses again while cooling. Note we are in The Netherlands and the weather has a mind of its own sometimes, so I think it might be that, but maybe you have suggestions. Thank you.
Hi Annelies! Thanks so much for trying the bread recipe and I'm so glad you liked it! As for the collapsing, it could be overproofing (letting it rise too much) before baking. You could reduce the amount of yeast to slow the proofing down a bit, and not let the bread rise as high before placing it in the oven. It will continue to rise a bit once in the oven, too. I'm not sure if that will help, but see if it works. Thanks for your question!
Andrea
Thank you for the recipe, I made it today and it came out amazing. I usually make other gluten free bread but wanted to try something new and this was even better than my regular recipe. I mixed some sunflower seeds and a tablespoon of chia seeds into the dough for extra nutrients. I used regular extra virign olive oil and it worked well.
Hey, Andrea! I'm so happy that you liked the bread and I love the idea of adding the seeds. Thank YOU so much for trying the recipe and for your comments!
Pam
Thanks for the measurements given in weights. I’ll be making this soon!
Wonderful, Pam! I hope you like it!
Denise in Toronto
Lisa. I'm so glad I found you and your recipe for this Buckwheat Bread! I am just so thrilled with the results. I have made it twice and both times it came out perfect. I'd never had buckwheat before. As a celiac I really appreciate your recipe. The only thing I thought that the 1 tbsp of xanthan gum seemed like a bit much so I reduced it to 1/4 tsp plus 1 1/2 tsp psyllium husk. Absolute perfection. Thank you so much!
Hey Denise...I'm so glad you found me, too! Thanks for the tip about the xanthan gum...I may re-evaluate the recipe at some point and make minor adjustments, so it's good to get feedback and great to know that the recipe still worked with the tweaks. I'm so happy you like the bread...thanks for the comments!
Pinky
Thank you Lisa for the wonderful recipe .
I made the bread today .It was soft from the middle part of the bread ....kept for bake the second half by 150c for 20 mins . Was the temperature right kindly advice.otherwise the taste is awesome.
I'm glad you liked how the bread tasted, Pinky! If I have understood your comment correctly, you baked the bread at 150C, which in too low a temperature. As stated in the recipe, the baking temperature should be 180C or 350F, so that may explain why your bread was still soft in the middle. It is also good practice to check the internal temperature after the total baking time of 55 minutes to make sure it is 93C or 200F to make sure it is done. I hope that helps.
Van
Hi, recipe and photos look great! Thanks for sharing. I want to try it but really want a substitute flour for the tapioca starch. I have been diagnosed with gestational diabetes so I want to use flours that have high fibre and protein content. Also tapioca won’t offer much in terms of nutrition and I’ve been suffering with terrible morning sickness and haven’t been able to eat very well, hence trying to get as much nutrition from the little I can stomach...
The following would be good flours for me: quinoa, teff, sorghum, almond, amaranth, oat, chickpea or coconut. Would any of these be able to replace the tapioca? Or maybe you even have other suggestions ??
Thanks 😊
Thanks for the question, Van. The purpose of the tapioca starch (or cornstarch or potato starch as can often be found in other GF bread recipes) is that it is a binder and is a required component that gives the bread it's soft squidgy texture and acts as a sort of a glue. Unfortunately, the flours you mentioned are more often substitutes for the brown rice flour component and they don't have the same qualities that the starches provide. Without the starch, the bread will simply be dense, heavy, and dry, and unfortunately, I don't know of what you can substitute the starch component with.
Scott
I tried but being my first loaf of anything, it came out very dense and wet. One observation was that when mixing, the dough gummed up my mixer bad, so couldn't get a long thorough mix and i used standard olive oil.
Do you have any suggestions? Or is what I mentioned the reason for the fail?
Hi Scott. It was gummy and wet even after baking? Did it rise? The type of oil you used should not have made any difference. If any of the ingredients was not measured correctly, if the yeast wasn't active and the bread didn't rise, or perhaps if the oven wasn't the right temperature...any of that could have played a factor. Unfortunately, I wish I could help more, but it's very difficult to figure out what could have gone wrong without having been there.
Scott
Thanks Lisa for the feedback. The yeast was a typical bread packet, i added it dry to the dry ingredients. The mixture did rise a little bit, was still about 1/2" under the lip of the pan, but was little action for sure.
I'll try again soon. I'm no baker, so it might take a couple tries.
You want to make sure the bread rises above the edge of the loaf pan, but no more than 1/2" above the edge. So you might not be letting it rise long enough? The time is merely a guideline as everybody's room conditions can vary, and again, how active the yeast is can also play a factor. I appreciate you giving the recipe another try and thanks for checking back in!
Cata
I love this bread and I have made it several times in the bread machine. Thanks!
Thanks so much, Cata! I'm glad to hear that you like it and that it works in the bread machine!
Marilyn
Hi Cata, do you mind sharing how you did it with the bread machine? Did you make it on the GF program? Thanks!:)
Hi Marilyn. I'm not sure if Cata will get your message, so I'm stepping in here to try and help. I believe the GF program on bread machines mixes and proofs the dough once instead of twice, which is exactly what you want for a GF bread.