Soft and chewy on the inside and tasty all around, these cheesy Korean mochi QQ balls are easy to make and easy to eat! It’s another delicious gluten-free baked treat you’re going to love!

You may be wondering, what in the world is a mochi QQ ball?
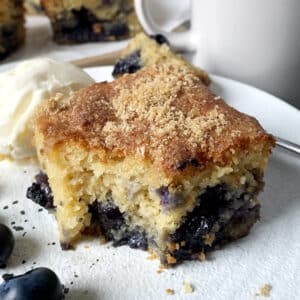
Judging by the photo, they're clearly baked balls of some sort.
But mochi? QQ?
A distant relative to the Brazilian Cheese Bread (Pao de Queijo), these cheesy QQ balls are soft, chewy, and incredibly tasty. I love eating them with a soup or salad, and one ball is usually enough to satisfy...but then they taste SO GOOD that it's hard to resist a second!
It's All About the Dough
QQ balls are made from mochi dough, which is made from glutinous rice flour, sometimes referred to as sweet rice flour. Despite the names, this rice flour is not sweet, nor does “glutinous” refer to gluten.
Glutinous rice flour is made from short grain rice which is sticky when cooked. So this flour makes sticky or chewy bread. As a bonus, because they are made from rice flour, they are also gluten-free!
Mochi can also refer to Japanese mochi flour, but you do not specifically need Japanese mochi flour to make these balls. Any glutinous rice flour from your Asian food store will do.
What about the QQ? I discovered QQ is the sound of the Taiwanese word for “chewy”. I had originally thought that it was a sound that referred to a Korean word for "chewy", but luckily, a reader enlightened me and I stand corrected! So these are still, technically, Korean mochi balls...with the Taiwanese QQ "chewy" reference thrown in for good measure.
Either way...mochi QQ balls = glutinous rice flour chewy balls = DELISH.
You need just 7 ingredients to make QQ balls: whole milk, oil, salt, glutinous rice flour, an egg, Parmesan cheese, and cheddar cheese. If you really want, you can use just one type of cheese and then it's even easier!
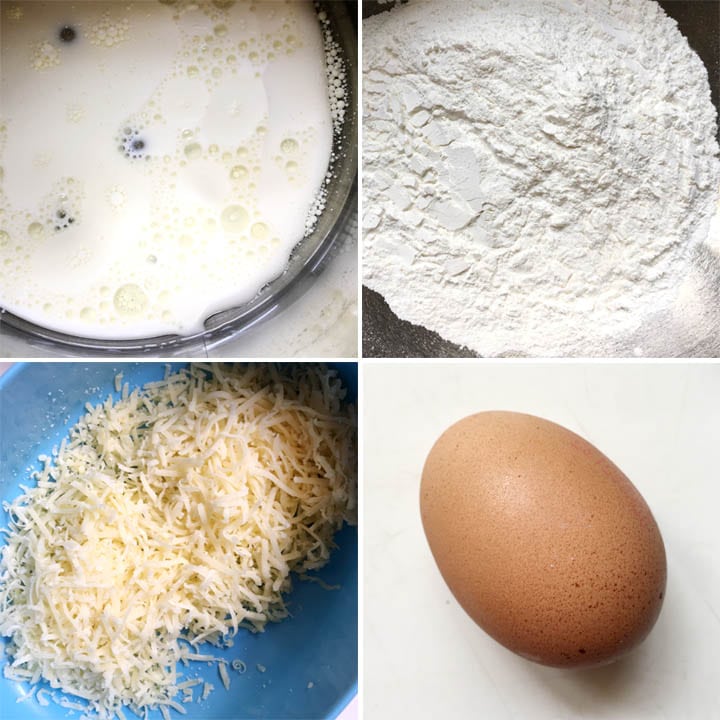
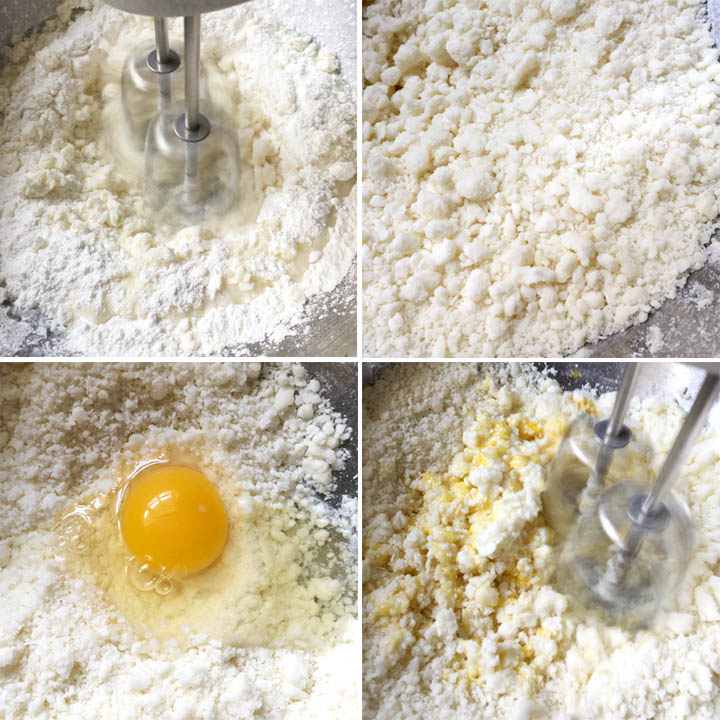
Making the dough starts with heating up the milk, oil and salt. Combine the hot milk with the glutinous rice flour and mix it until you get little rice balls the size of pellets. Then you add in an egg to glue it all together and mix until you get a cohesive dough.
From there it’s time for the cheese! Add the cheese to the bowl and use a spoon or spatula to blend it into the dough until it's all nice and happy.
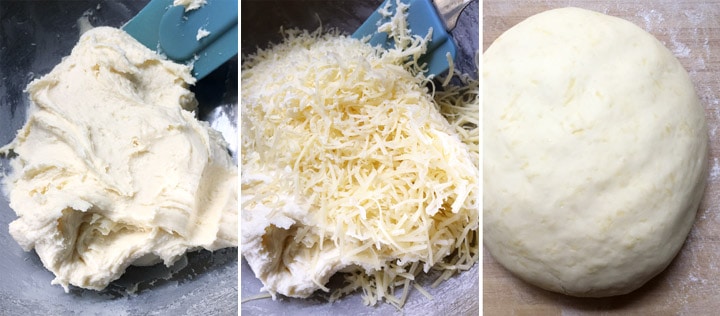
At this point, this dough can easily be handled and shaped into a ball.
The Balls
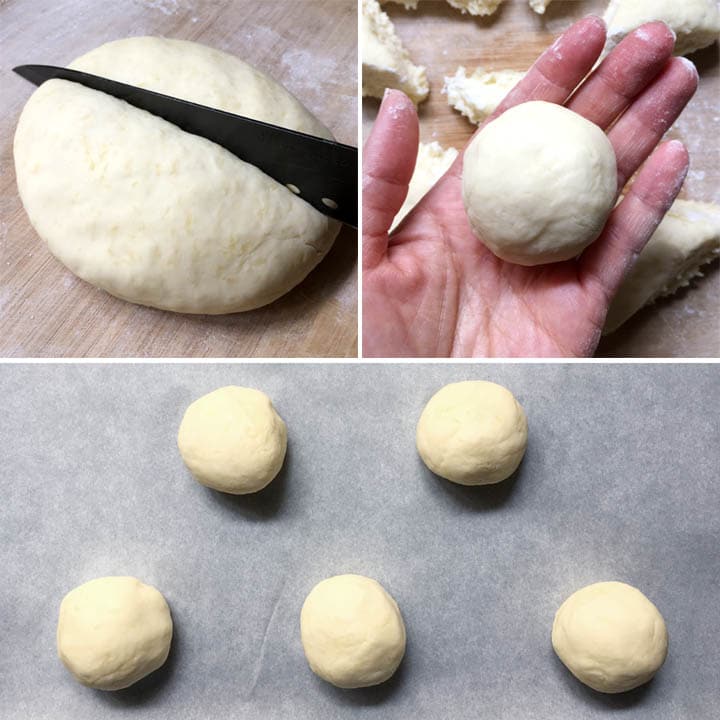
With a sharp knife, cut the dough ball into 8 equal pieces, shape into balls and space out evenly on a parchment-lined pan.
Bake and you’ve got mochi QQ balls!
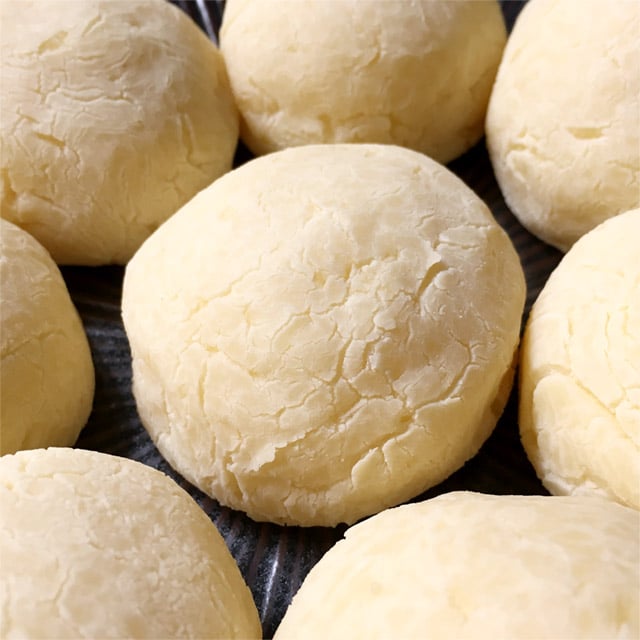
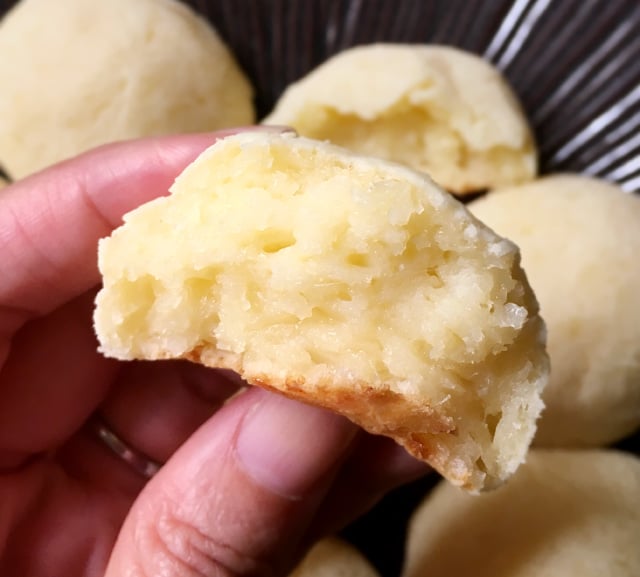
These may not look like much, but seriously, they are SO GOOD! They are crisp on the outside, and incredibly soft and chewy on the inside. And you can’t go wrong with the cheesy flavor.
I first saw QQ balls at a grocery store bakery here in Hong Kong. I had no idea what they were or what exactly they were made from, but they looked good enough to buy some to try...and I was so glad I did! They came in different flavors like cheese, chocolate, green tea, and pumpkin...but cheese was the obvious choice for us and they ended up being the overall favorite! I had to figure out how to make them myself and after several tries, I was super pleased when we all took a bite and said, "This is it!"
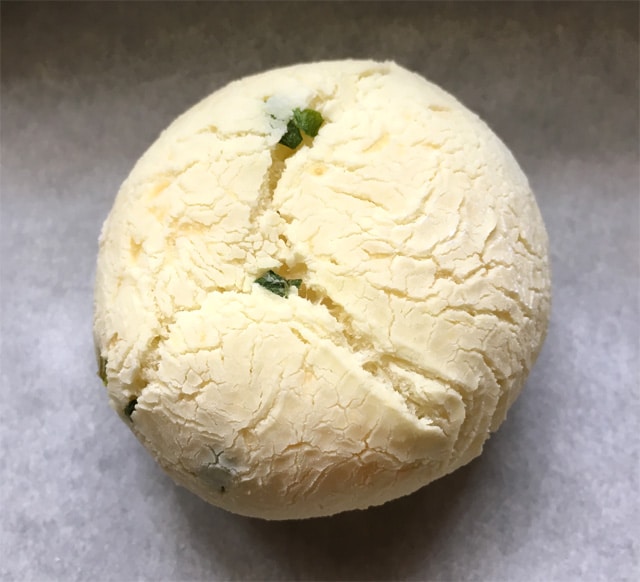
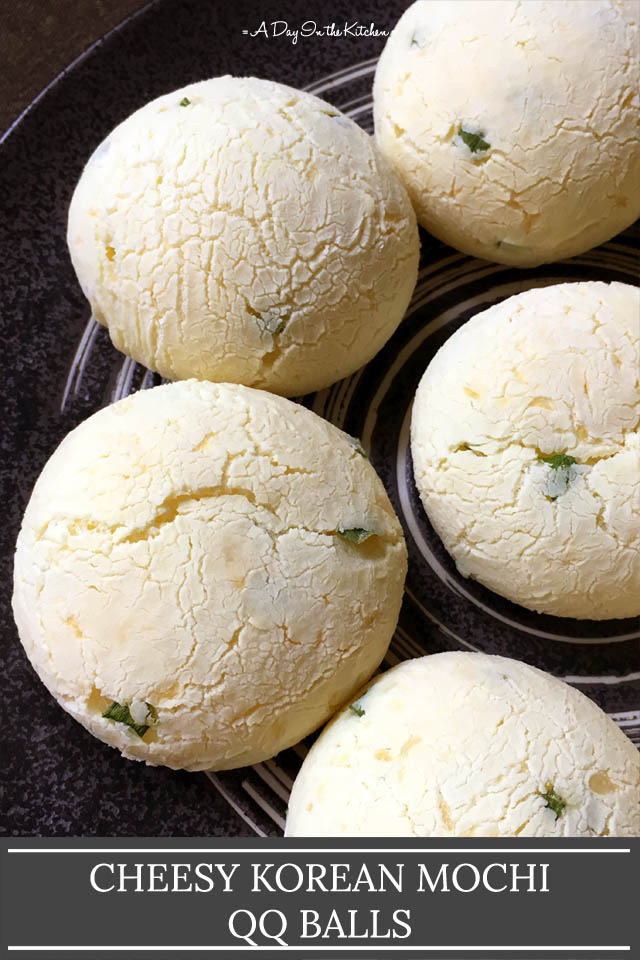
I haven't tried making any other flavor variations yet, like the chocolate or pumpkin or green tea, but those may be experiments worth trying! I have, however, made the cheesy balls with a generous helping of chopped green onions and they are so good!
I'm thinking the chocolate version may be a good experiment to try next. What do you think? Would you like to see this recipe with different flavors? Let me know in the comments below!
In the mean time, definitely get to making basic cheesy version because you are going to LOVE. THEM. Crisp. Chewy, Cheesy. Gluten-free. It will be hard to stop at just one!
~ Lisa.
Watch How To Make It!

Cheesy Korean Mochi QQ Balls
Ingredients
- 200 g glutinous rice flour
- ½ cup whole milk
- ¼ cup light olive oil
- 1 teaspoon salt
- 1 egg
- ½ cup grated Parmesan cheese
- ½ cup grated cheddar cheese
- ⅓ cup finely chopped green onions or scallions (optional)
Instructions
- Preheat oven 375 deg F (190C).
- Add glutinous rice flour to a mixing bowl. Set aside.
- In a small pot, heat whole milk, oil, and salt over medium heat until just steaming.
- Add the hot milk to the glutinous rice flour and beat with a mixer until mixture resembles small pellets. Let cool slightly for about 5 minutes.
- Add the egg to the bowl and beat again with a mixer until well-incorporated. Use a spatula or wooden spoon to mash it all into a cohesive mass.
- Add grated cheeses and chopped green onions (if using) and stir well into the dough with a spatula or spoon.
- Dust your work surface and your hands with glutinous rice flour and shape the dough into a ball or disc.
- Cut the dough into 8 pieces, rolling each piece into a ball.
- Place dough balls on a parchment-lined baking sheet and bake for 30 minutes until you see cracks in the surface of the balls.
- Let cool slightly before serving.
Notes
- Look for glutinous rice flour or sweet rice flour in your local Asian market. The brand does not matter as long as it's the correct type of rice flour.

- 200g of glutinous rice flour is approximately 2 cups + 5 tsp.
- This recipe, as with most gluten-free baking recipes, works best with weight measurements because they are more accurate.
- These volume measurements were made from spooning each of the flours into the measuring cups/spoons (so they are not packed) and leveling them off.
- If you have any leftovers, store in a sealed container or bag for a day.
- Heat up any leftover mochi qq balls for 5-10 seconds in the microwave to soften.

Nutrition
**Post was updated July 21st, 2020 with a correction being made about the "QQ" term being a Korean term for "chewy", when it is, in fact, a Taiwanese term.

Cynthia Villanuevs
Hi Lisa. good day to you. Thanks for this recipe. I just wanted to find out if I could use evaporated milk instead of whole milk. Please let me know. Regards.
Hi Cynthia! Thanks for the question...I think evaporated milk should work fine. I would certainly consider giving it a try.
Karlie
I am an average cook at best but these turned out great! Thank you!
Fabulous, Karlie! Thanks for letting me know!
Evy
Hi, this recipe could be "the one" i've been looking for, for quite some time! I want to try in minutes but i only have regular rice flour, in my country there's no glutinous rice flour, would a regular rice flour work? Or do you have anything in mind to add to ingredients if i use a regular rice flour? Thanks a bunch in advance 🙂
Thanks for the question, Evy. Unfortunately, this recipe will not work with regular rice flour as it is completely different from glutinous rice flour. They will end up hard, dry, and not chewy in any way. The only thing I can think of substituting or mixing into a bit of regular rice flour is tapioca starch (more starch than rice flour), but that still will not yield the exact results as if you used glutinous rice flour.
Evy
Thank you Lisa, that's still great news for me, I already have tapioca starch at home, wow, got so exited! I just miss bread a lot and i got bored from all other flours or couldn't like the smell or taste... I absolutely will try your recipe! So, to make it clear, if you had to, how would you try it? Do you think i should use, say, 120gr tapioca starch plus 80gr regular rice flour?
If I were to try this experiment, I would start with 150g tapioca starch and 50g rice flour to see how it works. You could also make just half a batch to run the test. Good luck with it, Evy, and let me know how it turns out. Also, another option for a chewy bread type recipe is my Pao de Queijo. The recipe is similar, but not exactly the same as the Mochi Balls and it uses all tapioca starch. https://www.adayinthekitchen.com/chewy-brazilian-cheese-bread/
Evy
🙏🏼 I cannot thank you enough! I've just checked your Pao de Queijo recipe and this is the first time i saw tapioca starch used this way. I absolutely surely will try both recipes and let you know, thank you again 😊🙏🏼
Didi
Hi I followed the recipe .. is the crust supposed to be hard. Insides are soft. I baked 30 mins at 190. Any recommendations to have the outer crust softer?
The crust is supposed to be crisp, but I'm not exactly what you mean by hard. You could try brushing the outside of the mochi balls with some oil before baking, or alternatively, you could try adding a bit more oil to the dough, keeping in mind that adding more liquid will make the dough a bit stickier to handle. Let me know if you try the recipe again, Didi.
Jay
Hello, I just wanted to drop in and say that QQ is not the Korean word for chewy that is a Taiwanese word. The Korean word for chewy is jjolgit jjolgit.
(I say this as someone who is both Korean and Taiwanese)
Wow. Thanks, Jay! I appreciate you enlightening me! I've corrected the information in the post to reflect that information.
Jenny
Hi, I was wondering if I could replace the light olive oil with regular vegetable oil or unsalted butter?
Yes, those should work fine. Thanks for the question, Jenny!
Juliana
I tried once by using exactly the same recipe and they tasted wonderful. For better control of calories, I cut half on cheese volume and they were still good enough to attract my colleagues. Really want to try out green tea.
That's awesome, Juliana! I'm still working on the green tea version and hope to come out with the perfected version soon!
Jade
Just made these! Can you freeze them?
Sorry, Jade. I've never tried so I don't know if they freeze well or not. If you wanted to test it, I would freeze one, then bring it to room temperature before reheating.
ham
I followed this recipe, but i can still taste the flour texture and the flour smell. Any ideas where I missed out?
I'm not sure. You could try adding more cheese, or perhaps mixing in some onion or garlic powder into the rice flour to see if that makes any difference.
Miann
Hi! These look delicious but I am wondering if I can substitute the milk for a non diary option or use water instead? Thank you.
I have not personally tried this recipe with water or a non-dairy option, so I am not sure how they would work out. If you're looking for non-dairy in this recipe, you may also run into an issue with the cheese, and if you omit that, then you'll want to find a different way to add flavor. If you try the recipe without dairy ingredients, please let me know how they turn out! Thanks for the question, Miann.